Pages

Saturday, July 27, 2013

Forecast for Today--Sunny (Revisiting Butterick 5450)


Butterick 5450

It has just been a week and a day since I have sewn with this pattern and here I am creating another version. In an effort to reduce my fabric stash, I dug through my pile and found a yard of cotton eyelet in ivory and a European linen in "electric lemon" both purchased last year from Fabric.com. I also found enough cotton batiste to line the whole dress.

L-R:  Cotton Blend Batiste, European Linen 4.8 oz, Alix Eyelet.


I decided to use the eyelet for the bodice. However, it was not only lightweight and sheer, the nature of the eyelet holes meant I had to make sure the seams were neatly finished so I opted for French seams.

To achieve this French seam, I sewed the two pieces wrong sides together in a 1/4" seam, ironed the seam flat to one side, folded the sewn pieces right sides together  then sewed the final 3/8" seam.


Here is the bodice and its lining.


In the original pattern, only the bodice is lined. Since the linen was a bit sheer, I opted to add my own lining. I just duplicated the main fabric skirt pieces using the lining fabric and then attached them together at the bodice seam and side seam (where the zipper opening was).


This time, I also didn't use invisible zipper as I decided to recycle a regular zipper from an unfinished project.


I used a lace hem tape for the skirt hem.

I just used narrow hem for the skirt lining. 


Nothing screams summer like ivory, eyelet and linen!


I found this pretty crochet trim in my stash and still deciding on whether to use it or not.


Here is a comparison of the two dresses from the same pattern.


Although I love both these dresses, I can predict the linen will drive me crazy as it wrinkles like mad. 


Thursday, July 25, 2013

The Easiest Initial Pillow Cover


Monograms and initials, as part of home decor, will never go out of style. There are several ways to get the personalized look--embroidery, applique and iron-on transfer to name a few. I have chosen to follow the easiest and cheapest route.


For this DIY project, one can use a ready made pillow cover or sew one. I did the latter using some leftover drop cloth (more on drop cloth projects next time) for the pillow panels and scrap twill fabric in black for the piping trim.


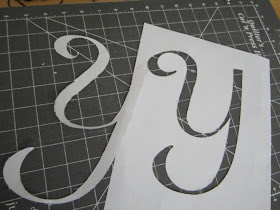
 Print your desired letter from a word processing program in your computer. I used Word Art (font French111 BT size 96)  for my letter.


Using an X-acto knife, carefully cut out the letter. Using the negative space as a guide, trace the letter to your pillowcase. 


If sewing your own pillowcase, trace the letter to right side of one fabric panel before sewing.


Use a permanent marker to fill out the letter. Trace around the edges first before filling in the spaces.


Let completely dry and heat set with iron on dry setting.


Insert pillowform. I slipstitched the opening for my pillow case. I also added contrast piping in black to add more pizzazz to the simple design. 

Here is the finished product. 


Monday, July 22, 2013

It Should Not Have Been Complicated (Jalie 3245)

Jalie patterns are one of my all-time favorite patterns. Not only do the fit and design approximate that of RTW, the instructions are easy to understand. I thought  the racerback tank from no. 3245 was the perfect complement to a maxi skirt.

Jalie 3245
Raglan Tee, Racerback and Tunics


This project could easily have been a one-hour or less project. There were only four pieces--front, back, armhole and neck binding.

So how come it took me one whole afternoon to finish it? Let me start with the fabric.


I had this beautiful warm mauve rayon jersey from Gorgeous Fabrics. It was really soft with a lovely sheen. 


There was some rolling on the selvedge but it was manageable.


As with most knits, finding the straight grain can be challenging. My plan was to layout the pieces the usual way--on the folded edge.


But I decided it was better to cut the pieces on a single layer of fabric. To do that, I just had to retrace the pattern pieces for the front and back and tape the corresponding halves together. 


Had to use lots of pins before cutting the fabric.


Here are the cut pieces. 


It should have been smooth sailing after this. Just sew the shoulder & side seams then attach the neckline and armhole bindings. 

But the fabric was quite sheer. I thought I could just wear tank underneath but I realized it was a racerback cut so I wasn't sure how that would look like. 


So here comes another sheer fabric I found from my stash. 


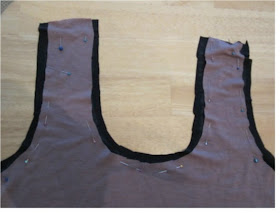
I decided to line the mauve jersey with this black knit.


I cut the side seams following the original pattern. 


But when it came to the armhole, neckline and hem, I added an extra half inch to the seam allowance. 


I put the original fabric on top of the lining fabric. You can see the extra fabric around the neckline and armhole.


This is the part that ate up most of my afternoon. I wanted a raw edge finish to the neckline and armholes so I used the coverstitch machine to sew the two pieces together. But, no matter how much I fiddled with the settings, I could not get rid of the "tunneling." That was not the look I was aiming for. 


After sewing and ripping, ripping and sewing, I finally gave up and went back to my good old regular sewing machine. I just stared at the list of decorative stitches on the dashboard and randomly chose no. 43. 


Hmm, I liked how it looked so I decided to go for it.


Close-up views of the neckline.


The armhole.


I didn't sew the hemline pieces together.


Originally I was planning to cut leave the black lining longer but I had an accident with the sharp scissors and ended up cutting the two fabrics same length.


The decorative stitch gave the hemline an almost rolled hem effect.


Here is the completed project.


Back view.


Paired with the maxi skirt from previous post. 


And me, styling it!


What should have been a simple project was complicated by my own doing but it all turned out for the best!