Pages

Thursday, December 25, 2014

Sewing for Christmas


What do I give a daughter who loves The Lord of the Rings and a son who is obsessed with Pokemon? Both are young adults so toys and games are out of the question. I thought nothing can beat their own one of a kind shirt featuring what they like most. 

The Fabric
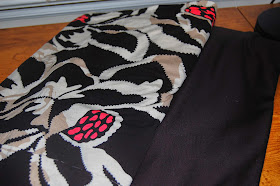
Middle Earth Map for her

Anatomy Lessons in Pokemon panel fabric for him


                         Both of the above fabrics were purchased from Spoonflower.com.
Each was a 42" width polyester/spandex blend with four-way stretch which the site referred to as "modern jersey." The fabric had a very nice cottony feel and the print was great. The only drawback was the price but for a special project, that was not a deal breaker. I used a black rayon jersey from my stash as a contrast to the printed fabrics.


                                                                       The Pattern


Jalie 3352 for her, Jalie 2918 for him
Jalie 3352 is a pattern for a dolman top with options for color-blocking. I opted for the 3/4 sleeve version and bound neckline. I found the pattern true to size based on chest measurements. This is a modern top with curved longer hemline on the back.

Jalie 2918 is a men's/boy's T-shirt pattern and is also true to size based on the chest measurement. I sewed the short sleeve round neckline version. 


For both patterns, I used the same techniques:
1) A stay tape to stabilize shoulder seams
2) Cover stitch to finish the hemlines


The background color on the printed fabric coordinated beautifully with the solid black fabric.


The look on their faces when they opened their gifts was priceless! 


Monday, December 22, 2014

It's a Wrap!


The contest is over. I still cannot believe I became a finalist! Although I did not win, the whole experience was so rewarding. I learned so much from the other participants and my sewing mojo totally came back.

I am sharing the feedback I received from the judging committee.


"What a whirlwind of a month-and-a-half it has been. The first Sewing Bee contest on PatternReview was an exciting time and also tiring for so many of you. 

Now that the contest is over, we the judges would like to share our thoughts with the finalists. Please know that we liked each and every entry in this contest and judging this contest was one of the hardest things we've ever done.

Your collection was very classy. The A-line skirt of the first round firmly set that tone. The lining drafting was admirable for that particular pattern. For round 2, no one would guess that dress came from men's shirts even though some of the original elements were retained. Your round 3 pictures showing the process were excellent; we felt like we were there with you, step by step. The belt brought that dress all together, with the solid in the front and print in the back. It was our favorite piece from your collection. The round 4 jeans looked - as much as we could see them - very nicely done. The biggest difficulties with these entries (particularly the last round, the pants) was seeing the details. Many of the critical photos were quite dark, and since photographs were all we have to go by, that put you at a significant disadvantage to the other finalists. We all admired the sophisticated nature of all the items. 

Thanks, 
The Sewing Bee Judges"

To see the winner of the challenge and the rest of the entries for the final round, just visit this link to the Pattern Review website.


Saturday, December 6, 2014

Sewing Bee Round 4 (Final Round): The Pants Challenge

So I made it to the final round! I was so excited. Never could I have imagined I would go this far. But my excitement completely turned to trepidation when I learned the final challenge was to sew a pair of pants. Not just a pair of pants but one sewn with waistband, zipper, closure, pockets and hem using non-stretch woven. I have never sewn a pair of pants. My previous attempts were limited to unfinished muslins that were eventually set aside. I knew I was in trouble. But then I realized I had nothing to lose. I was at the end of the challenge and even though my chances of winning were really nil, I still win if I am able to overcome this aversion to pants fitting and sewing. 

After browsing the website for possible patterns, I decided on Vogue 8774. I have more use for jeans than trousers so I thought this was a good way to start. 

Pants fabric is one type of fabric I do not have in my stash so I made a quick trip to our local Jo-Ann store. I found a dark indigo denim fabric made of 100% cotton. It was a bit heavy, being 11 oz, and I thought that was perfect for the winter season. 

The pattern has been reviewed several times already at the Pattern Review website so I am not going into a lot of details here anymore. Just a few points that might be helpful:

1) I would recommend to serge finish all edges before proceeding with construction. There are no references to finishing the raw edges as one goes along so it is easy to overlook this. 

2) If the fabric is thick (like mine was) an alternative method to the construction of belt carrier would be advisable. I struggled with turning the loop inspite of my loop turner. 

After several muslin fittings, I finally got the courage to cut into my real fabric and sew the real thing. 


The fit still needs some more tweaking but I am quite happy with my first attempt at pants sewing. 
Hopefully the next one I sew will be in a more relaxed atmosphere. The Sewing Bee was a  fun experience but I'm relieved it's over. 


Monday, November 24, 2014

Sewing Bee Round 3: Two-Knits Winter Dress

The Great Pattern Review Sewing Bee - Round #3


For this challenge, we were asked to use the Winter Street Dress pattern  from the Pattern Review website and put our spin on it using only two knit fabrics.

I went through my fabric stash and decided to pair this beautiful printed rayon jersey with a solid black one.

The bold stylized print reminded me of the iconic DVF wrap dresses and it inspired me to put a "wrap" spin on my garment.

To the original bodice, I topstitched a V-neck overlay consisting of two overlapping fabrics.


After sewing the shoulder seams, I attached the neckline binding with the binding turned towards the wrong side hence acting like a facing. 


I kept the box pleat design on the skirt but lined it with the solid black jersey.


I chose the 3/4 sleeve option minus the flounce and opted for modified cuff finish on the hem.


And the final touch was the fabric tie belt. 

I constructed it in such a way that the print fabric was on the back and the solid black on the front to offer relief from the solid black on the back and overall print on the front, respectively. I made sure to use interfacing to add body and structure to the belt.


Here's the finished garment.


Dressy enough for Church.

Cool enough for winter!

I didn't drastically change the pattern as I wanted to retain some of its features. I chose to enhance it and I'm quite happy I came up with a dress I wouldn't hesitate to wear in public!


Thursday, November 13, 2014

Refashioning Men's Shirt

The Great Pattern Review Sewing Bee - Round #2


So I hit the thrift shop and came home with these two shirts that were in great condition.

Gap shirt in size 15-1/2
Ralph Lauren in size 17-1/2

I toyed with the idea of cutting strips from the shirts and piecing them to make one whole fabric from which I would cut my pattern. But I thought that would totally obliterate any trace of the original garments and it would be no different than just using a store-bought fabric. I wanted to make something totally wearable that would still show hints of the shirts. So I ended drafting my favorite Butterick pattern 5450 to make a dress. I know it's not a showstopper but I hope it's creative enough to let me advance to the third round.


Curious to find out more about the construction? Read on...
The bodice front was cut from the Ralph Lauren shirt. 
However it was not enough so I had to improvise and use the Gap sleeve for the center front pleat.


The two shirt fronts were used for the dress back. I omitted the side zipper closure asked for in the pattern.


From the Gap shirt, I cut the skirt part of the dress and several bias strips to make the piping which I used to embellish the neckline and armholes.


Finally, I used the remaining leftovers to make a strip-pieced belt. I used the collar of the RL shirt as the framework of the tie belt. 

I'm quite happy with this entry. No matter what happens, I'll end up with a perfectly wearable dress. This is the first time I have tried refashioning an RTW and after my fruitful visit to the resale store, it certainly won't be my last!


Scallops & Plums, an A-Line Skirt Recipe

The Great Pattern Review Sewing Bee - Round #1


Pattern Review is currently holding a four-week long sewing challenge aptly called "The Great Pattern Review Sewing Bee Contest." With mixed trepidation and excitement I signed up and this is the requirement for the week 1 challenge. Sew an A-Line skirt with the the following components: lining, waistband, zipper, some kind of closure, hemming. Sounds simple enough right? But with more than 300 participants, how do I create something that will stand out and give me a chance at advancing to the next round?

After rummaging through my modest pattern collection, I found this adorable "Tiffany Skirt" pattern from Serendipity Studio.


This is a multi-sized pattern (XXS-XXL) that offers six varying designs and two length options. By piecing fabrics of varying prints and colors, the possibilities are endless.

I decided to go with variation 2 which uses two fabrics. I fell in love with the dark plum and ivory combination of this two fabrics which I found in the quilting section of our local Jo-Ann's store.

100% cotton 

The most basic of A-Line skirts would have one front piece and one back piece seamed together at the sides. In this pattern, the front and back were dissected into numerous interlocking pieces pretty much like a jigsaw puzzle. The addition of a scallop shape at the bottom edge of each interlocking piece serves to add a unique touch. 


A total of 16 pieces made up the front and back skirt.
Note that in some of the pieces, I did not cut out the scallops at the bottom edge. I purposely left about 4 inches extra so I could hem the scallops instead of leaving them unfinished.

Looking at the number of pieces, making a muslin looked intimidating at first but there was an easy way to do it. Since I have never sewn a garment using this pattern company, I was not familiar with how the sizing went and I had to make a muslin. The skirt front and back were divided into top and bottom tiers and for the muslin, I only had to assemble the top tier pieces to determine if the waistline fit. I tried a size M based on my waistline measurement but the finished muslin was loose by 2" so I went down two sizes to get the right fit. 

Now for the assembly:
Starting with the front skirt pieces, the top tier piece was joined to the corresponding bottom tier piece by overlapping 1" at the scalloped edge. This was repeated until all the top and bottom pieces were sewn together.


Since the design was supposed to feature frayed edges, the instructions called for straight machine stitching along the overlapped edges. I did not like the idea of fraying on my skirt so I went with zigzag stitches hoping they will control the fraying.

Once all the top and bottom pieces were sewn, the front panels were then seamed vertically.


Before doing the same with the back panels, the zipper had to be attached first. I preferred using an invisible zipper and just followed the instructions that came with the zipper packaging.


Once the front and back panels were assembled, they were then seamed together at the side. 
However, after trying it on, I was not happy with the fit and I had to take in a few inches along the hip area while still trying to preserve the A silhouette.


Once I was happy with the fit, I drafted my own lining based on the finished skirt. 

The lining pieces consisted of one front piece and two back pieces. The latter were sewn together along center back leaving an opening a little longer than the actual zipper opening--just enough so the lining did not get caught in the zipper.


The lining was  joined to the skirt, wrong sides together. 
Since I was planning on attaching a waistband (which was not included in the pattern), I skipped the facing. I just basted the two layers along the waistline and proceeded to prepare the waistband.

To create a waistband, I cut a 3" wide piece of contrast fabric the length of my waistline plus an extra 1-5/8" for the overlap at the back where I intended to sew the button. 

I used a medium weight fusible interfacing on the waistband then folded 1/2" along one long side.
Using a clapper allowed for a very crisp folded edge in spite of the interfacing.


The unfolded edge of the waistband was attached to the waistline leaving approximately 1" overhang on the right side and around 5/8" on the left. 


With the seam folded towards the waistband, I topstitched on the right side.

The next pictures illustrate how I sealed the short edges of the waistband so that the right side was flush with the zipper edge and the left side had an overhang for sewing buttonhole.
Waistband folded towards the right side and sewn.


Left opening edge of waistband.

Right opening edge of waistband

I used handstitching to secure the folded edge to the wrong side of the garment.


The pattern did not provide for hemming instructions as the scalloped bottom edge was supposed to be left unfinished to achieve a frayed look. However in keeping with the requirements of the challenge, I needed to hem the bottom of the skirt. Besides as mentioned previously I did not care for the frayed look.

The following pictures show how I achieved the finished scallop look.

Folded extra hem allowance to the right side.
Serged the long edge.
Traced the scallops.
Stitched along the traced edge.
Trimmed closely around curves and clipped corners.
Turned scallops out.
Used lace hem tape to finish hemming.


For the lining, used narrow hem.

Finally, I added a crochet lace trim around the scalloped edges on the top to cover the zigzag stitches.


And here's my not so simple A-line skirt!