Pages

Thursday, April 28, 2011

The One-Hour Top (Jali 2444)


After hours of toiling on the prom gown, I needed to work on something easier to give me time to recover and restore balance (sort of yin and yang). So I decided to finally bring my collection of knits out of storage and put them to good use.

For the past six months, I have been alternating two L.L. Bean activewear tops for my three-day a week workout. Needless to say, they are now both worn out from frequent trips to the washing machine and dryer. Every time I see a pretty workout top from the store or online, I am tempted to buy it but I don’t because: 1) it probably won’t fit me (usually too long), 2) it is too flimsy and 3) I am not willing to shell out $35.00 or more on something I can easily whip out myself. In my search for moisture-wicking fabrics, I learned that duo-dry, dri-fit, dry-flex, and performance fabric all refer to the same thing.

   I was lucky enough to find some really pretty prints from Fabric.com on sale. I only needed half a yard for a top but the minimum purchase was one yard. I used Jalie pattern 2444 which is now out of print but still available online for download. This was a quick project. The only delay was figuring out the right size. I constructed two tops from some scratch knit fabrics using two different sizes and determined which one worked best for me. Once I decided on the right size, it was pretty much like assembly line sewing. One can easily finish this top in an hour without any interruptions. But alas, people in this household have to eat. So I have to cook!


I love this pattern as it allowed me to mix and match fabrics. I used twin needle stitching on the first one. On the last two I just topstitched with a single needle as I noticed that the fabric tended to bunch up in between the two lines of stitches.
Next time, I will try to extend the armhole and see if I can make a cap sleeve. As for now, I have one outfit for each workout day of the week.




Tuesday, April 26, 2011

Patience and Perseverance Required a.k.a. The Prom Gown

The first of week of March, I gallantly told my daughter to choose any sewing pattern off the Internet after she told me she wanted me to sew her prom dress.

“So when is the prom?” I ask her.

“Oh, sometime in April?” she replies nonchalantly.

“When in April?”

“I don’t know, I have to check.”

So instead I check at the school’s website. It’s April 16. I thought, “Oh I have more than enough time!”

I also browsed for patterns online and showed her my suggestions. She eventually decided on a Vogue gown pattern by Bellville Sassoon. I checked the reviews of past users and found only three who dared made the
gown. All but one rated the pattern as difficult. Detailed reviews enumerated a lot of mistakes on the pattern itself. With that, I asked my daughter to reconsider and choose an easier Simplicity pattern instead. But no, she was in love with that gown! So I thought I’d give it a try and warned her that if it doesn’t work out, she’ll have to go shopping at Macy’s for her prom dress instead.

I sewed a muslin first and fitted it on her. It was perfect around the waist and hips but a little loose around the chest. Since the pattern did not have typical easily alterable seams, I knew I had to cut out second muslin, this time going a size down but the thought of going through the tedious steps one more time made me decide to do it directly on the fabric which was an “atom red” crepe back satin that I purchased from Jo-Ann’s (armed with ten coupons). All the while, I had my fingers and toes crossed!


The pattern had only a few pieces but it was like completing a complicated jigsaw puzzle. I would never have figured out how to do it without the helpful tips posted by reviewers from Pattern Review.com. Even after I had pieced the parts together, I still had no idea what it was supposed to look like. I was already hemming the gown and I was still filled with doubts. But everything became clear after my daughter tried it on.


This project really required a lot of patience and perseverance. In the end it was all worth it. I learned how to sew on an invisible zipper. I learned how best to cut and sew delicate slippery fabrics. I was able to make my first bustier. After this, every other project felt oh so simple I was breezing through them.

Details on the pattern can be read on this post.

Pattern Review for V2929 (Bellville Sassoon Vogue Designer Original)


Description on pattern envelope: Bias dress is floor length, lined and has contrast panel, contrast knot, asymmetrical seams, side slit, train, zipper and foundation with boning.


Ribbon

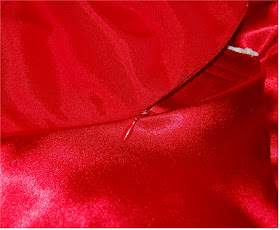
Invisible Zipper
(Sewn along the curved seam.)


Attaching boning to foundation.
(Muslin shown here.)


Back of foundation


Fabrics recommended : crepe back satin, crepe, satin and crepe de Chine. Lining: charmeuse.

Crepe Back Satin in Atom Red
(I used the "wrong side" of the fabric for contrast and ribbon.)


Charmeuse in matching color used for lining.
(Lining was not straightforward either. A bit confusing to piece together.)


Level of difficulty: advanced.

Helpful tips:


  • Sew a muslin first to ensure right fit. The seams are curved and asymmetrical so it is really difficult to alter once sewn. It might help to choose fabric with stretch. I did not use satin stretch as the color my daughter wanted was not available.

  • Apply correct techniques for handling slippery delicate fabrics. I used satin pins where needed. I avoided chalk or pens to mark but only employed tailor’s tacks. I used Microtex sharp needle for my machine and a Bigfoot to ensure even feeding. I invested in a cheap invisible zipper foot to apply the zipper.

  • Since pattern is cut on bias, be careful not to let fabric drape out of shape when putting it aside. The only time I let it hang was before hemming.

  • Before applying the invisible zipper, I stabilized seam with organza tape.

  • Be sure to copy all markings down. I usually skip a lot of markings when I sew but with this gown, it is essential to put the pieces together.

  • Follow layouts carefully paying attention to the right and wrong side of fabric.

There are some mistakes in the pattern. The marking for clipping below zipper stop is off. Same with marking for the top of the side slit.