Pages

Monday, January 25, 2021

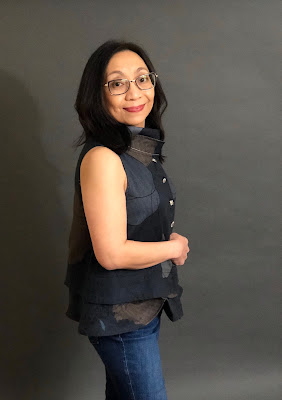
Butterick 5891 Another Artsy Top

 Here is another garment I made for the #SewJapanaseInJanuary Instagram challenge. And I must say, this has go to be my favorite, not only because of how it turned out but because the whole sewing process was so much fun!


It all started with the fabric--heavenly soft and hauntingly beautiful Japanese cotton double gauze from the 2020 Nano Iro line. This iteration is called "Waltz" and features floral themed print in muted dark tones of black, blue, gray and brown. Being double gauze it is made of two layers of very fine fabric. 


I have made Butterick 5891 in 2017 using another Japanese double gauze fabric. 


Although I loved this first version, I thought there was room for improvement in terms of fit and method of construction. 


Here are the construction modifications I made:


1. Collar
 
I added a facing to the collar. The pattern only used a single collar piece and had one finish the top edge by narrow hem. I thought it looked better this way especially when the wrong side shows when the top is worn with unbuttoned neckline. 

2. Center Front Facing

Instead of sewing the center front facing over the collar, I sewed the collar over the facing. 


3. Narrow bias binding on armholes

The pattern uses a 2" wide bias binding which was supposed to be folded in half then sewn to the armhole and then folded over. For my fabric, that method would not have worked well so instead I used a 1" bias binding and sewed it the way I knew how. 

I also tweaked the fit.

1. The first time  I made this pattern, I did not alter anything and found the top had way too much ease. I removed a total of 1-1/2" from both sides starting from the hemline tapering to nothing at the armhole. I had to make the same changes to the peplum.

 2. I made a 5/8" narrow shoulder adjustment. 

 Design Details

I added some decorative contrast stitching in the following areas:


Off-center back seam

Around the Mandarin collar following the attachment line of the other collar. 


Double topstitching where the peplum was attached to the bodice.


This time I followed the addition of pleats on the peplum. In my first version I skipped them. 

I played around with silver toned metal buttons, mixing and matching the different shapes. 


And now here is a look at the inside of the garment where you can also better appreciate the asymmetrical styling from the bodice to the peplum. 


And finally photos of the outside of the garment. 


Thursday, January 21, 2021

My Best Practices, A Series Featuring My Favorite Sewing Techniques: Flatlining

~~~~~~~~~~~~~~~~~~~~~~~~~~~~~~~~~~~~~~~~~~~~~~~~~~~~~~~~~~~~~~~

Many times in the midst of a sewing project, I would remember a technique I wanted to use but not having used it often enough, I would end up searching the internet for a “refresher course.” Sometimes I forget the term to use so it takes me longer to find what I need especially when I have forgotten to bookmark a site. Since I have this sewing blog, I thought “why not write about those techniques so it’ll be easier to search for them next time?” So I will be posting a series on my favorite sewing techniques and filing them under “My Best Practices!”

~~~~~~~~~~~~~~~~~~~~~~~~~~~~~~~~~~~~~~~~~~~~~~~~~~~~~~~~~~~~

   Since discovering this technique from Pattern Review several years ago, I have employed it several times in my sewing projects but it was only very recently that I found out the technical term for it was "Flatlining" thanks to Kathryn Brenne, a sewing guru I follow at Emma One Sock and Instragram. 

What is it?

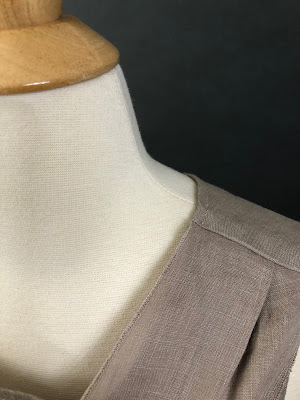
Flatlining in sewing is a technique used to underline and finish seam in one step. It can be used as a way to underline a garment or treated as a lining in itself. It works best on vertical seams like the sides seams of a skirt or pants or the princess and center back seams of a blouse or dress.

How to do it?

1. Cut the underlining fabric using the same pattern piece as the main fabric but double the seam allowance on the vertical seams only.

In this example, I am cutting one bodice piece from the main fabric which is linen. 

I laid out the same pattern piece over my underlining which is silk organza. 

The seam allowance on the pattern is 5/8" as shown by the pencil marking. 

I am working on the vertical edge and in this case, it is the center back seam of a back bodice. I will do the same on the side seam.

I am adding an additional 5/8" to the vertical seam only. Using a 5/8" curved ruler makes marking easier. 

It was easy to mark with a pencil on the silk organza. 


The underlining has been cut with the additional seam allowance. The rest of the seam allowances follow the original pattern. 

2. Do this step one vertical edge at a time. Lay out the underlining and main fabric right sides together. Sew the vertical seams in a 1/4" seam allowance. 


Notice that the underlining is wider than the main fabric. 
Align them on one vertical edge first. 

Sew the vertical seams together in a 1/4" seam allowance. 

3. Turn right side out The underlining piece will wrap around the edge of the main piece because the  former is cut wider. Smooth the layers then press.         


Notice that the underlining has more excess than the main fabric. 


Smooth out the excess towards the side edges so the underlining wraps around the main fabric. 

A closer view from the right side. 


After pressing. 

View of the wrong side. 

4. From the right side, stitch in the ditch. This will secure the seam allowances. 

Stitch the two layers in the ditch. 


4. If you want, hand baste the remaining edges together before proceeding. Then treat the two layers as one and proceed with the rest of the sewing.


This is a skirt and it shows the side seam after the flat lined front and back pieces were sewn together. 

Seams pressed open. Instead of raw edges, you can see a nicely wrapped edge. 

Another closeup of a flatlined seam, this time on the center back of a shrug. 

A couple of finished projects using flatlining:

 
This is a Marcy Tilton shrug (still have to post about that garment) where I underlined the lower back using the flatlining method. I did not add any other lining and left it as is. I thought the effect of the pretty fabric showing through the sheer organza was quite lovely!
i
This one is a skirt which underlined using the flatlining method but I also added a separate lining. If you are interested in reading more about the skirt (New Look 6345), check out the post I wrote about it more than a year ago here.


Sleeveless Scarf Blouse--A Shape Shape Project


As mentioned in my previous post here, I joined the Instagram sewing challenge #SewJapaneseInJanuary and here is my second finished garment. This time I used a pattern from a Japanese sewing book called “Shape Shape” by Natsuno Hiraiwa. If you are interested in reading reviews about this book, check out the Pattern Review website. This book is written in English and it features 19 sewing patterns for clothes and accessories. What's special about the patterns in the book is they feature designs meant to be worn multiple ways. As stated in the back of the book, "Shape Shape offers everything you need to sew minimally constructed designs with maximum visual impact."


Although I have owned this book for a few years now, this is the first time I have tried a pattern from the book.  I made project 1 which is a sleeveless scarf blouse.

This is the modeled photo.


  And this is my version.

This nicely shaped blouse features front and back darts, side button closure on one side and attached pleated scarves. The scarves can be draped in a variety of ways allowing for several looks from a single garment. This pattern is so easy to sew and the construction process is straightforward. 

Join me in dissecting this project through photos!


It was a bit challenging for me to trace the lines as there were several pattern pieces overlapping and only black ink was used. Some were in gray but it was still challenging. FYI, there were four other projects printed on the above pattern page and they were all overlapping. If you're used to Burda Magazine patterns, then tracing this pattern should be easy peasy for you!


This top has a very nice graceful silhouette.

And these are some of the reasons why:

Front Darts

Back Darts

Buttoned closure on one side

 
The obvious design feature of this top are the attached scarves. 

Here you can see them hanging freely. They are sewn to the shoulder seams, sandwiched between the front and back shoulders. Each scarf measures 26.5" long. 


A close-up of the scarf attachment point. It is pleated. 

The pattern instructions call for a narrow 5/8" hem on the exposed edges of the scarf. 
I preferred to finish by using a narrow overlock stitch using the roll hemmer on my Juki serger.


One of my favorite features is the side button closure on the left side seam. 

 
The left front and back sides of the bodice have self-fabric facing for the buttonholes and buttons attachment. 

Both neckline and armholes are finished by using bias binding made from self-fabric. 


A view of the armhole. 

A peek at the wrong side. 

View of the front bodice wrong side. 

Before I show the different ways to style this blouse, here are cliff notes of some construction details worth mentioning:

*The size chart can be found on page 40 of the book.

*There are only three sizes (Small, Medium, Large). I used size Small based on bust and hips. For good measure I compared the pattern lines with another top pattern that fit me well. 

*I deviated a bit from some of the instructions. I skipped the flat fell seam on the shoulders. With my serged seams, I thought it was unnecessary.

*I also did not heed the instruction to do a narrow 5/8" hemming on the scarves. The narrow overlock serged stitches I used was more delicate looking and more polished looking from both sides. 

For an outlined review of the pattern used, check out my review at Pattern Review.


And now a gallery of the different ways to style this lovely top!