|
| Both had elasticized hem bands. One was done in denim and the other a combo of cotton twill and corduroy. |
 |
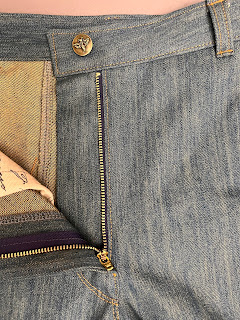
| Shown here styled with my True Bias Lander pants in pink corduroy and brown moleskin. |
 |
| Paired with my Style Arc Kew Pants in denim and twill. |
I have posted a detailed review of the jacket pattern which is the PE Smitten jacket here at the Pattern Review website.
This post is all about my third version made out of faux leather. Because of the fabric's unique characteristics, I decided to share some detailed construction notes that were dictated by my choice of fabric. But first a preview of the finished jacket.
 |
| It is soft and supple! |
FABRICS
 |
| Because it is faux leather, just like any fabric it has a selvage. The small stretch runs crosswise. |
 |
| A close-up of the woven fabric backing. |
 |
| I used 100% Cupro Bemberg for the lining. |
 |
| I used Woven Weft Fusible Interfacing for all the jacket pattern pieces. |
PATTERN
1. Because the fabric was super soft and drapey, I decided to add a little bit of heft to it by interfacing all pattern pieces.
2. I also lined the whole jacket and because the pattern did not include it, I drafted my own.
Drafting the Lining:
1. The front of the jacket pattern was made of four pieces (yoke, center/middle/side front). For lining, I pinned all these pattern pieces together along the included seamline and traced a new one to come up with a single front piece.
2. The back of the jacket consisted of yoke, center back and two side backs. I used the same pieces but made a new center back piece that had 4 cm added to the width along center fold to create an upper and lower pleat.
3. I used same pattern piece for the sleeves but skipped the cuff.
4. I did not need lining for collar because the jacket had an upper and under collar.
5. I also did not need lining for the hem band.
With those modifications in mind, here are the rest of the construction details.
CONSTRUCTION
Fabric Prep:
The care instructions for the faux leather specified dry clean only. I tested a square of it and washed with cold water without wringing and it came out okay. However I think I will have the jacket dry cleaned just to be on the safe side.
The faux leather took to pressing beautifully. I tested first on a scrap piece.
*Used wool-silk setting on iron (which is two notches below linen and cotton).
*Used silk organza press cloth.
*Pressed on the wrong side only.
*Used care when it came to amount of time and pressure applied.
*When fusing the interfacing, I used a Teflon sheet to protect the sole plate of the iron.
Layout and Cutting:
Faux leather:
*I laid the pattern pieces right side up over the wrong side of the fabric. Before doing so, I checked the right side for any flaws. I have read others cut with right side of fabric up. I tried this at first but it was harder to cut because the fabric would bunch up under the rotary cutter.
*I used single fabric layout. This was a lot more work but is necessary for accuracy.
*Although pins tend to leave holes, I used them sparingly by carefully placing them within the seam allowance. I also used pattern weights.
*I alternated between scissors and rotary cutter depending on the area being cut. For instance, I find it easier to maneuver around curves using scissors.
Lining:
*Because lining was slippery, I laid the fabric over sheets of tissue paper and clipped the edges to the cutting board.
*I also used single layout and because my fabric had directional print, I had to take note of that.
Notions:

Needles:
*Stretch needle size 65/9 for the faux leather.
*Microtex size 70 for the lining.
Thread:
*Mettler Matrosen all purpose polyester thread in matching color. I used the thread matching service offered by Sawyer Brook. The thread was perfect for both construction and topstitching on faux leather.
Misc:
*Teflon sewing foot
*Walking foot for topstitching used in conjunction with some tissue paper/plain paper on top of the faux leather. I found it easier to be accurate with this foot when sewing two lines of topstitching.
 |
| Just showing here why it was easier to be accurate with walking foot. |
 |
| Improvised with paper to make it easier to sew over faux leather. |
*Pins and Clips
 |
| In some areas when I used the clips I had to protect the fabric with tissue paper. Those clips could leave some unsightly marks. |
Machine Settings:
1. For seam sewing, I used medium length straight stitch (2.8).
2. For topstitching, I used 3. I did several tests first with scraps.
Construction Highlights:
i. After cutting all jacket pattern pieces, fuse interfacing to each piece using Teflon sheet protector underneath the iron.
ii. Assemble main jacket per pattern instructions with the following exceptions:
*Front piece--do not fold the center front (3/8") seam allowance. Instead it will be sewn to the center front lining later.
*Hold off on placket construction until lining is ready.
*Hold off on collar and band attachment till lining is ready.
*Construct sleeves according to pattern instructions.


iii. Assemble lining.
*Front piece--since it is one piece, no need to assemble anything here.
*Sew pleat on center back. I used 2" long for upper and lower pleats.
*Assemble back pieces (side back to center, then to yoke).
*Sew front to back along shoulder seams.
*Sew sleeves minus cuff.


iv. Join main jacket and lining.
*Sew the center front lining and jacket using the 3/8" seam allowance.
*Follow instructions to complete the rest of the placket.
*Baste lining neckline to main jacket neckline.
*Sew collar on.
 |
| View of the center front of the jacket and lining sewn together. |


v. Hem band
*Baste lining to jacket along hemline.
*Sew in band as instructed.
vi. Sleeves
*Slipstitch sleeve lining to jacket sleeves along the seamline that joins cuff to sleeves.
vii. Closures
*I tested some buttonhole stitches using my machine. They were fine but I did not want to risk it on the actual jacket because something always messes up when it's time to sew the real thing! So I just sewed some decorative button and then functional snaps underneath.
So here are some photos of the finished jacket showing the outside and the lining.


 |
| Too scared to sew buttonholes! |