Sunday, June 30, 2024

My Handmade Barrel Jeans: Style Arc Kew

Barrel, lantern, horseshoe, balloon--different names that refer essentially to the same style of jeans that are currently trending. The common denominator is a wide silhouette that tapers at the hem to give that unique shape. I became obsessed with it after seeing a pair of Sid jeans by Tibi early last year. Looking for a sewing pattern to replicate it was not that difficult. I just googled "barrel pants sewing pattern" and a number of choices came up. It was narrowing them down to one that proved time consuming.

So you may wonder how I eventually decided on the Style Arc Kew pattern. Here are the reasons:

Shape

The barrel silhouette in this pattern is a result of shaping not just along the sides. The back is made up of two center and two side pieces all of which are gently curved along the lengthwise edge. In above photo, 1 refers to the side back, 2 is center back and 3 is front piece.


A long dart on the center of the front near the bottom hem contributes to the tapered look. 

Fit

It has a close fit around the waist and hips before gradually widening. Hence it is not shaped like a literal barrel. It is more subtle. 

Waistband

It is flat and shaped with no elastic. Some barrel pants pattern achieve their shape because of the excess fabric from the elasticized waist. 

Design Details  

Gotta love the details that allow one to use jean style construction.
 

Diagonal front pockets with coin pocket on right side. Opportunity for applying metal rivets not just as accent but also as corner reinforcement. 


Belt loops


Fly front

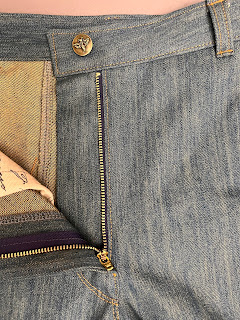
Zippered front opening


Opportunities for topstitching. 

And more topstitching!

Construction Highlights:

I used a 100% cotton denim from Nick of Time Textiles. It weighs 10 oz but because it is stone-washed it is super soft. Bonus that it didn't leave any blue stain marks on my fingers at all!


For the pocket bag, I used some leftover upholstery canvas with my favorite design--calligraphy print. 


Essential tools of the trade

Topstitching and all-purpose threads, appropriate sized needles, rubber mallet, awl, metal button, etc. 
Notice the square piece of denim fabric. That was my handy dandy tool for easily sewing over thick humps. I could easily fold it to approximate the thickness of the seam I was sewing over. Better than any fancy tools!


Topstitching


For topstitching, I did not backstitch at the beginning and end. Backstitching usually creates a mess of threads on the wrong side (at least in my case) and the start/stop points can be pretty obvious when using thick thread. Instead, I pull the topstitching thread to the wrong side, knot together with the bobbin thread and hide them within the seam. I also apply Fray Check sparingly. In above example, I did not do the knot since the edges were serge-finished and sewn to the main pocket. 

Here are samples of where I used topstitching. 

Fly front

Front lower dart and hem. 

Zipper edge, waistband, belt loops.

Center/Side back seams. This is a view of the wrong side. I serged the seams together, pressed them to the sides and used double topstitching on the right side. 


The scariest part for me was attaching the rivets as I have never done it before. I was afraid of creating a big hole in the finished garment. I practiced several times and proceeded with extreme caution. After the first successful application, I thoroughly enjoyed the succeeding ones and was even looking for more projects to apply rivets to:)


 For belt loops, I finished the raw edge with zigzag before turning under and sewing the loop over the waistband. I sewed them down first with straight stitches using the all purpose thread and then topstitched with zigzag using topstitching thread. 

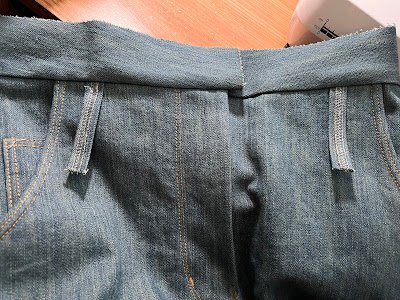
I eventually finished the exposed short raw edges of the belt loops with tiny zigzag stitches. Nothing worse than threads fraying after using belt on jeans. 


Hard to see here but those are the tiny zigzag stitches. 


I sewed the top of the belt loop with straight stitches first before doing final topstitching. 


View of the finished belt loop. 


Although I have already sewn the Kew pants many times before, I am really proud of how this latest one turned out. I love the finishing details that mimic a traditional five-pocket jean. And I love the toned down version of my barrel jeans! All that's missing is a proper jean label. 

Here are some modeling shots:)


I posted a detailed review of the Style Arc Kew pattern here

Additional projects using linen can be seen here.

Finally, I wrote a post that includes the photo-guided step-by-step instruction for sewing the Kew and it can be found here.


Saturday, June 29, 2024

Style Arc Kew Pants --Step-by-Step Construction in Pictures

I have lost count of how many times I have sewn this pattern because I love the silhouette so much! There was a lot of head scratching the first time because of how confusing the instructions were even with the accompanying illustrations. But subsequent versions were a breeze as I had my notes to refer to. I decided to take pictures of each step as I was sewing my fifth version. Hopefully, this post will prove helpful not only to me but others who may be struggling trying to understand the instructions.

*My detailed review of the sewing pattern itself can be found HERE at the Pattern Review website. 

The order of construction is as follows:

I. Pockets

II. Fly/Front Zipper

III. Legs

IV. Waistband

I. Pockets

For the pocket construction, the detailed photo tutorial can be found in a separate blog post HERE under Sewing Techniques. 

Two front legs with completed pockets. 

II.  Fly/Front Zipper

I labeled my cut fabric pieces with masking tape. Kindly refer to the following legend:

R10--right (meaning fashion side, not wrong side) side, fly bearer

R9-- right side fly facing

Encircled R Front--right front leg as opposed to left

Encircled L Front--left front leg

This is the fly bearer. 

Fold in half lengthwise with wrong sides together. 

Sew the long raw edges together and the bottom short edge using 3/8" seam allowance. Finish edges as desired. 


After fusing interfacing to wrong side of fly facing, finish the curved raw edge as desired.  I chose to serge.

Before proceeding, best to finish (serge) raw edges of the center front. 

Lay the fly facing over the right front leg along the center matching raw edges along the top and center. Sew in place. 


Fly facing sewn in place. 

Understitch fly facing as shown. 


Baste a straight line along the 3/8" seam allowance on the top edge of both front leg pieces. This will serve as a guide for zipper stop placement. 


Align the zipper tape right side down along the raw edge of the left front center.  Make sure the zipper stop on top clears the 3/8" seam allowance.


Baste in place. 

Lay the fly bearer over left front aligning the serged long edge with the raw edge of the center. sandwiching the zipper in the middle. 

This is what it should look like. 

Sew in place using zipper foot. 

View of the wrong side after sewing in place. 

View from the right side with fly bearer turned to the right side. 


Edgestitch on the right side, making sure the fly bearer is out of the way. 


Sew the right and left front leg pieces together along the crotch. But don't do it all the way to the edge like I did. I had to unpick so I could sew the front and back together along the inner legs. Just sew about an inch down from the bottom of the zipper. 


View from the right side after left and right were sewn along the crotch. 


Lay out the remaining zipper tape over the fly facing on the right front. Place the zipper tape about 3/4" away from the seamline. 


Zipper sewn in place. 


Fly facing folded to the inside. 

I used a Button-Fly guide template to help with topstitching a nice curve along the right front opening. 


I traced the template on tracing paper so I could pin it  as shown in the succeeding pictures below. 


Keep the fly bearer out of the way when topstitching up to the start of the curve only and then put the fly bearer back underneath so it could be stitched to the fly facing along the curve.


After topstitching. 


View from the inside. The fly bearer is caught in the topstitching along the curve only. 


Reinforce front crotch seam with straight stitches. 


III. Legs

  1. Assemble back.

Sew each side back piece to corresponding center back piece. 
Serge raw edges together. 

Press serged seam towards side (away from center).

Topstitch. 


  2.  Sew front and assembled back along inner leg. Serge seams together and press to front. Topstitch. 

  3. Sew crotch. Serge seams together and press to one side. Optional, topstitch. 

  4.  Sew front and back together along side seams. Serge seams together and press to back. 

  5.  Hem. I deviated a bit from the Style Arc instructions and applied a 3/4" wide bias tape to finish the curved edge of the front hem for a neater look.


Sew the bias strip right sides together with the curved edge. Start 1-1/4" above the edge  (assuming this is your hem allowance). This ensures that the area will not be bulky once hem is folded in. 

Press sewn bias out. Turn the hem allowance to the right side, pin in place and sew following the 3/8" seam allowance of the curved edge. 


Turn bias to the wrong side, fold once and stitch in place. 


View of the finished area after dart is sewn. 


IV. Waistband

    *Again  I deviated from the instructions which tell you to sew the belt loops to the top edge of one waistband. Instead this is what I did:

I basted the belt loops to the waistline, right sides together, within the 3/8" seam allowance.  
Since the notches for the belt loops are on the waistband pieces, I had to pin the waistband to the waistline first and transfer the notches. 


Sew the interfaced waistband to the waistline as shown above. 


View of the right side. 

Sew the remaining waistband to the interfaced one  along the top edge using 1/4" seam allowance.
Understitch and then press to the wrong side. 

To secure inner waistband in place, stitch in the ditch from the right side. 

View of the finished waistband after stitching in the ditch. 

Fold the remaining free edge of the belt loop about 3/8-5/8".


Pin in place. 

Sew using tiny zigzag stitches. 

Make buttonhole and sew in button.