 |
| Burda 898 |
This pattern was brought to my attention by one of the Pattern Review website members (Elona) when I posted in the forum asking for ideas on how to duplicate an RTW draped top.
The pattern is for a bias cut sleeveless top with V-neck or round neck options. It works best for woven fabrics like linen, silk or rayon.
Unlike the big Four patterns, I find Burda sizing more accurate to my body measurements and I don't need to size down. Based on my bust measurement, I made a muslin in size 34 and was delighted to find out no alterations were needed.
I was inspired by this J.Jill linen top. I had a chance to visit a brick and mortar store and tried it on. Unfortunately, it did not look as nice on me as it did on the model so I scrapped the idea of duplicating it. However, the suggested Burda pattern really caught my eye and I thought it was a perfect pattern for my lovely Japanese linen fabric.
Pattern
Burda 8987 is already out of print but I was able to find a copy on Ebay. It is rated start 2 meaning "little sewing experience" needed. Being a paper pattern, it has 5/8" seam allowances included. My envelope contained multiple sizes from 34-46 (equivalent to US 8-29).The pattern is for a bias cut sleeveless top with V-neck or round neck options. It works best for woven fabrics like linen, silk or rayon.
Unlike the big Four patterns, I find Burda sizing more accurate to my body measurements and I don't need to size down. Based on my bust measurement, I made a muslin in size 34 and was delighted to find out no alterations were needed.
Fabric
I used a Japanese linen with border print on sides along the lengthwise grain.
I wanted to use the border print as the hemline of my top and since the front and back pieces were supposed to be cut on the bias, I had to be creative with my pattern layout. The front pattern piece was also drafted to be cut on the fold but laid out across the bias. I cut it into two across the center and just added 5/8" allowance.
Sewing details
This top is really an easy project as stated on the envelope. There were only two main pieces (front and back) and the rest were facings (for the armhole and neckline).
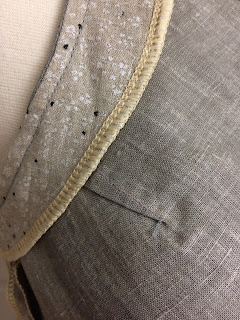
As shown above, I serged the raw edges except on the front and center back seams because I didn't want to add bulk to those areas. Since they were cut on the bias, I wasn't really concerned much about fraying.
 |
| Center front seam. |
Fit:
As mentioned above, I was able to sew this top without any fitting alterations which is a plus because normally, I would have to shorten bodice length on tops or dresses because of my being short-waisted. In the pattern envelope, the top looks really short as modeled. Other reviewers also noted the bodice being too short on them. But for me, it was the perfect length. As measured from the base of the neck, the center back length of the finished top is 19".
Chest: 35 -3/4"


What a lovely little top! Really, you've given a fine lesson in bias work.
ReplyDeleteThanks so much!!!
Delete