First time I sewed this pattern was three months ago for the Pattern Review Endless Combination contest. I loved how it fit right from the envelope and the only alteration I needed then was to shorten the total length. I used a woven stretch then. For this latest version, I used a 100% cotton corduroy that did not have any form of stretch at all so I played it safe by adding ½” to the side seam allowances of the waistline and waistband. It turned out to be the right decision as the finished pants fit me so comfortably!
Although the pattern envelope says Misses’ Slim Leg pants, I
thought the pants was not really slim fitting. There are five design options to
choose from and all of them are just variations of the hems—cropped or regular
length, buttoned vent on side, buttoned vent on back and plain. All views
featured a waistband with belt carriers, fly front zipper opening, single
button closure, side pockets and faux welt at the back.
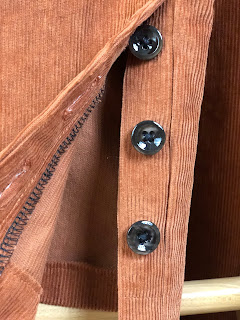
I made view C which features a cropped length with buttoned
side vents on the hem. However, I used a regular length because I thought
cropped length does not flatter my short stature. I also skipped the belt
carriers, side pockets and faux welt.
Fabric:
If you have sewn with corduroy before, then you know it has certain characteristics that require special consideration.
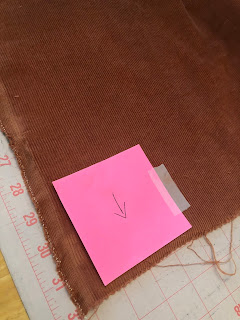
I checked the direction of the nap and marked accordingly with a small sticky paper to remind me while laying out the pattern pieces. I had to make sure all pieces were properly oriented.
I decided to cut the pattern pieces on single layer of fabric to avoid shifting.
Shown above are the zipper underlap and waistband.
Construction:
The sewing instructions in this pattern were really easy to understand and quite detailed
especially when it came to the fly front. Even beginners or those who haven’t
sewn a lot of this type of pant closure (like me) will have no trouble. With
that said here are some additional tips which I hope you will find helpful:
It doesn’t say in the instructions but I found
it best practice to finish the raw edges of both front pant pieces along the
curved edge. Otherwise (especially if you are using the serger) it will be
impossible to do so after the fly front has been assembled.
2.


Wonderful! I appreciate all of the information and detailed photos.
ReplyDeleteThanks for stopping by! Glad you found this post helpful.
DeleteJust discovered your wonderful blog and appreciate the detail that you share. Also listening to you on the Sew Organised Style podcast atm :)
ReplyDeleteThanks so much for stopping by Heather! I so appreciate your kind words!
DeleteI've stumbled on your blog via a sewing podcast and instantly recognised your trousers. I made some in brushed denim and took the same approach - the buttoned version full length. Yours look amazing and fit perfectly.
ReplyDeleteThanks so much Debra! This pattern is surely a keeper. I hope you are enjoying wearing your pants as much as I'm enjoying mine!
DeleteThank you so much for the details! I am so excited to try this in a polyester satin
ReplyDeleteThis comment has been removed by a blog administrator.
DeleteThanks for reading! I am delighted that you are trying the pattern.
Delete