PatternReview is turning 20 this November 28 and as a long-time member I am so excited to celebrate with the rest of the global community!
For this contest, participants are asked to make a top/shirt/blouse/tunic or dress inspired by Pattern Review. My so-called "milestone" top is inspired by all things related to the Pattern Review website. I decided the best way to show this was by designing my own fabric.
Presenting my designer top with a touch of whimsy!
If you have been reading my blog or checking out my pattern reviews, then you probably already recognize the pattern I used for this top. That's right, it's Vogue 1693 by Issey Miyake.
I first made this pattern in May of this year and in a span of six months I have sewn six versions! Can we say TNT (tried and tested) pattern?
I thought the pattern was the perfect canvass for embellishment and personalization.
If you notice, the right and left bodice of the top are vastly different. I am crazy about calligraphy and maps on fabrics so this was my chance to combine my two favorite design elements and do it in a very personalized way.
For the right side, I printed words and phrases on the base fabric (linen blend) and all the words were taken off the Pattern Review website. So upon closer inspection, you will see the names of the different contests, the forum topics, site features and more.
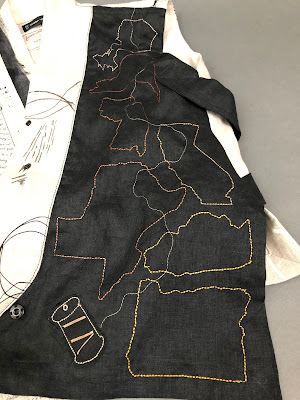
For the left side, I embellished a black handkerchief linen with outlines of the states where PR weekends were held in different years like Texas, LA, Oregon, NY, etc. I added an applique of a thread spool and stitched a thread coming from it to loop through all the different state outlines, sort of representing "the thread that binds the sewing community."
Printing on Fabric:
1. Word Document. On Microsoft Word, I created a document of several pages consisting of random words and phrases taken from the PR website. I experimented with different fonts and sizes and eliminated punctuation marks and margins. I initially printed on paper to see how it would look.
2. Fabric Prep. The fabric had to be treated with a special solution called Bubble Jet Set 2000 for HP (since my printer is Hewlett Packard). This is readily available at Amazon, Jenkins or Dharma Trading. There is also a solution specifically for Epson printers and a solution for all other printer brands.
I precut my fabric into same size as my printer paper then soaked the pieces in the solution for 5 minutes after which I let them air dry.
3. Fabric printing. After fabric pieces were dry, I ironed freezer paper shiny side to the wrong side of the fabric then fed them individually to the printer to avoid paper jam.


Printer in action!
4. Fabric piecing. After ink was dry, I sewed the fabric pieces together until I had enough yardage to accommodate the pattern piece I was cutting.
 |
| Wrong side showing how the seams were finished with zigzag stitches. |
 |
| Right bodice pattern laid out on the fabric. |
 |
| Right bodice cut. |
Embellishing on Fabric
1. Word Document. I copied and pasted free online images of my chosen state map outlines, printed them on paper, cut then traced them to my fabric using heat erasable pen.

2. Sewing. I used Totally Stable stabilizer underneath the fabric before sewing on the embellishment. For thread I used Sulky polyester embroidery thread for the top and Gutermann all purpose polyester for the bobbin. I used long triple stitches to make the stitches stand out.
 |
| I won this set of gorgeous embroidery threads for Sewing Bee 2019. |
3. Applique. For the spool of thread applique, I traced the shape on a black piece of linen fabric that was backed by a stabilizer, cut and sewed on it then used applique machine stitches around the shape to attach it to the main bodice.
Unlike my past versions, I totally eliminated the use of buttons and buttonholes and opted for sew on snaps. I added a decorative nonfunctional statement button to the front.
Here are additional views of the finished top.
And for icing on the cake, I created a special tag to commemorate the occasion!
For a complete review of this garment, check out PatternReview.com


Fabulous well fitting creative top that truly demonstrates your love of Pattern Review.
ReplyDeleteThanks so much! I really appreciate your taking time to read my post and leave such kind words!
DeleteI think you just won. Incredible.
ReplyDeleteOh wow! Thank you so much, I'm truly humbled!
DeleteI know I commented on the PR site, too, but thanks so much for sharing your creative process, and opening up possibilities I never new about; I have printed on transfer paper, but did not know you could print directly on fabric. Amazing; and this top is beautiful and clever... You must be the best dressed doctor in your town! (I just read your coat review, too!) DT
ReplyDeleteI really appreciate you taking time to read my post and leave such encouraging and kind words! I first tried printing on fabric a long time ago to make my clothes labels because I was too cheap to buy ready made ones! The problem then was my labels frayed around the edges after some time although the print held up:)
DeleteAbsolutely fabulous!
ReplyDeleteAbsolutely fabulous!
ReplyDeleteSuch a beautiful creation, Maria, wearable art at its best
ReplyDeleteThank you so much!!!
Delete