Although I now mostly sew garments for myself, every now and then I embark on some selfless sewing and the most recent one was a birthday gift to my husband. After browsing through a number of men's coat patterns, I found a really unique design which I showed to him beforehand for approval and now he is the proud owner of an OkiStyle Paris coat!
I have written a very detailed review of the pattern at
SewingPatternReview.com. This post is a supplement that features some construction highlights and photos that I could not fit in the review. It is not meant as a tutorial at all since the PDF pattern already includes step-by-step photo guided instructions. It is sold at
Etsy under Okistyle Patterns. (Note: I am not an affiliate, just an admirer!)
Fabrics & Notions
![](https://blogger.googleusercontent.com/img/a/AVvXsEjIt_CIoeJ-H87EJMo01-wHZXbti-CryLFn7gcF_-0hyXTLLOF-CLkpX1QCWwn9DWa0_pnpQYR7wvwsd6Cf5SV6oppNWJm8EeDmOH2lQ85oc_I--zmqjb2pcBmwdKFCbrWOpdoCAa00S8s_BKIG9ujRzc173ecF1zVy23cqH6YtpSHH97P0PqZa-A=w300-h400) |
The main fabric was cashmere wool coating purchased from Stonemountain & Daughter. It was napped so the first thing I did before laying out my pattern pieces was to feel the nap and mark the direction with a small masking tape tacked to the fabric. I cut my pattern pieces on a single layer, right side up. |
![](https://blogger.googleusercontent.com/img/a/AVvXsEgWK9gPn69gViZntYi3T2QoHqxGnTy7E-fhnbbvtVihcZAtGh7yjk2SNzMHbgOHlN6nz9Nx8PzEZu1-sDrodA2FfFhJwSH_an4yCsZ6SwqSzcvBYikNkJkwtchcKDbNNS40DuicP_JuYCbjJ3TBj-tmXRqSyfSkzxfEpF5V504UEMYfz1Fmhnmoaw=w400-h300) |
Not sure if it's obvious but I wanted too how how thick the fabric was. Good thing it was freezing in my sewing room so I didn't mind the warmth provided by the thick fabric! |
![](https://blogger.googleusercontent.com/img/a/AVvXsEhEs_Tx8_u8XVTuk6hsgecQEH_aN-5kDbNqaJrgahiAjs8Z4aXOfTijdFy45RnQ4M8LtG8Roba260WfwFPU4Ngw1nCCAcg82gqSBBd-uy4xyQUztFF_WskUCrY59tSB77FxOpv2GCFGRsDsu8oWpG0aU4au0RtWU7qBZlLxtNusKRsxct_Xuul7Fg=w300-h400) |
For lining, I used this burgundy colored map print Cupro Bemberg lining from Bias Bespoke. It was the perfect lining weight for a coat. |
![](https://blogger.googleusercontent.com/img/a/AVvXsEgaeXajOjePdndD79jQTrUlmz6yq4-TmhXadoA_zC3TgFDUu5h6NOw3PcVIItv5-Ia4HN3HamtHkjh38IEPYwYd2SwyxTdFCP2yq9KEt87nP57KrK3lLRnh2y8-i3k3lxzQZGBvERsXPIx_8dBTA7kXP5U0bjQWjIFab9Cvizcmg-SVAlex4FIO7g=w300-h400) |
I didn't want to use fusible interfacing on wool cashmere so I invested in some quality sew-on interfacing in the form of hair canvas which I bought from Emma One Sock. This one was the lightweight version and contained wool, horsehair and viscose. To use them I just sewed them to the main fabric within the seam allowances, similar to how one sews an underlining.
|
![](https://blogger.googleusercontent.com/img/a/AVvXsEg1885xpZ6IDUtjusOu-wpxXTsuIIFtMgG2iyskqBv4CGm6pmGIZqGnGspU68BzAbHGpTFG69XStWnbXs7mcASebOffUja2EZyMdGwzjgLr6VfK0Xr8qW6aAyfASPmCU851Ufl6z_0kCPDkyEv78zPOvCkBfr41RKqe-n932e6Gv0sMazBbztY8gA=w300-h400) |
For zipper, I went with a two-way separating zipper so hubby could easily unzip from the bottom when needed like while driving. It's size 5 antique brass purchased from Zprz.com. |
![](https://blogger.googleusercontent.com/img/a/AVvXsEg5x82TTxbWTwByK8ABavpQxXuar6BRhq1fjTFooAhlah7IDeQRc7L3yN_jJrXzVtBkBNF0vdASusHfCDzulr-MKG4S8o1nNzTVpUasSUL1HURnYRT9YG2Hq5P6JAj1WqJDauwD08fVwy1dcix5bhVStP23CL7_o8KdLYuL_uz0CGq1LuaKHMBzxQ=w300-h400) |
The pattern called for a single button closure on the collar. I opted for snap-on closure and found this beautiful sew-on snap that looked like buffalo horn but is actually high quality strong plastic from Bias Bespoke. |
Construction Highlights
Single welt flap pockets on the coat's front panel:
![](https://blogger.googleusercontent.com/img/a/AVvXsEiHuUkc2ZSUGrsdjwXUln_1Ul4F_W0NiKjC5EogyLslJpSRivRVtsFRDRYhEFDCXpT5IQr_TUCkQqyGU5aM2HpoOPqX9lLZMdK5qlg-ebmK-pU3kx1zQ75d6wwZZqcetdib6O0KCuCQq60tMAKi2ktm5k2O40TvQexmzilo9jPrzOcyJTiNKKclgQ=w300-h400) |
These are the flaps. One is shown with right side out and the other wrong side out. The flap is interfaced with the hair canvas. Unlike the 5/8" seam allowances that I used on the coat, I used 3/8" on this one to match the width of the pocket opening as marked on the pattern. |
![](https://blogger.googleusercontent.com/img/a/AVvXsEg_WFgFIYD4QXj8sGTjNEnfzuYJa4df98FfKHa3WWbuCsWprCh1GcCE6mw3muk4Rkrf7FlLb5q1V_JnICos36gigGzb7jgx9yaSQTceoyvZYDQNWE43e6aJoZboSoWiioFLRkjIWASLUNp1w7OtXNLgrnduMv4a5-oe9k88xMnQQsRqw8KkxwN-CA=w300-h400) |
Above you can see the placement and cutting lines for the pocket which I machine basted. The size of the seam allowance on both sides of the center line is 3/8". |
![](https://blogger.googleusercontent.com/img/a/AVvXsEheWGy7mV_pas7zIllQjNcJhlUafou3pDU2MN4Na3ZnKzVkvy2RenTtiCoPk9g_yOTdCaHlVzIs0bPrSsBhPk477apSY4v_SThyngVvpiC3EjiCXKBl9CMCAqyNniQXfRbJmIQ9_KyAm6xRRH9_RPYcVH7y3DA3Dy2z3usk-WWC1FkoxT8CqbBTkg=w300-h400) |
The pocket lining was basted to the coat along the placement lines. The long straight edge of the pocket matched the raw straight edge of the coat piece. |
![](https://blogger.googleusercontent.com/img/a/AVvXsEgrB05WUn7HZo7x3N6K2Hdmn14mU-2xvNUN_gxaPxRkJSsfB3ncNR1Ag-L0_F0h8r62AfDpv3_2DAPROW6Z3Y8lnuz7Li8xdQZJKhVgQfD38APJIduR_hMNCbUFCN1NPJ8udKJyugxT0CKPRLBFTr8tqT4gOV79BT1ZgE9X4tQUqmXyKmUUdcZpLg=w300-h400) |
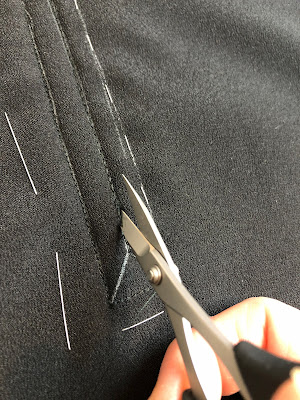
Cutting the pocket lining/coat layer. |
Here is a short clip showing how the pocket flap was inserted between the pocket lining and coat.
![](https://blogger.googleusercontent.com/img/a/AVvXsEgiVTtCpXHktYO91Svwp3B0f9s8w8FAzlOSs1rqcMhYlAlgJezr18yNDl-MVBCldcAE8wdDbX-XzjPO7D3oLVWsKI1fxJR_UTIQoEu3FGJ2cdx0i4i3kXP4dAEKaQFFqg9FjuwuzT2gFi0-L_x4xXM6H9rTDSLiJ-2RrjKLuFmqywVZ-Y6dviwBsw=w300-h400) |
A view of the cut area from the wrong side of the coat. |
![](https://blogger.googleusercontent.com/img/a/AVvXsEjNwfogbKYQnZVI1a5D5WbMPfYcpNJ9zFy1Guu34tM0elniUZ7kuxfJojIaLB6NYvgYd7Rsa8v04VHkrN2lZRe5OomuSUoyThQy2Dztb33FV83P40bLBa97_rsT7QRA68nMeT-tmV0hOmsEV5p2GAW0OhGed3kbIWOmGdejbjVLGAvReAGkFJo8CQ=w300-h400) |
This is the view from the lining side. |
![](https://blogger.googleusercontent.com/img/a/AVvXsEiqkaGq71KyQ448Yu9Al3ke6KfHi3Qu447hbSaW1GlUbVitVhqXXQHYv8rgFzylKhbJvxk7Emj7OaK0ldO4NaqHwfLh_NHsLUhSdx39FBKYo4Ak524nxbeE6ayOC7KICBFXN1tAMZASZopwWelXPhsH5P4HHH0bQfUzQOfPbmaiIWxzpGZLRnDzjQ=w300-h400) |
Understitching the area between the coat and the pocket lining. |
![](https://blogger.googleusercontent.com/img/a/AVvXsEipNsvbKJBTY2bKoeShhDw22WK7MXDlAA8bA6UOo4OHfvtmwx5M8jdbny4Yp7kZmHvswIrmL5EjeQfaNH0smgwBuVglk4hS-uS88W9mjwTd39uI-MrLJB5p3YHshOeb4afnRC_oJ0IVGPzc0vW3AyS76Ih1OcM483tB_7MVDWW6kGt5mAObKfmUwQ=w300-h400) |
After the flap was pulled out to the right side. |
Zipper:
To understand what I did with the center back vent, let me show first some photos of the finished area.
![](https://blogger.googleusercontent.com/img/a/AVvXsEhlmZhHk9MUHadaGO6LNWRosxLl2RQ5VUw4CS-328Lxol1ELeQwa40mKi0BVWrIhsMUT44PccPFV4DkvllFDfEQSZnNiEbAU6GzlQYHI-hC6MW_XyMESJQgn3j2Z8ftqx4nOXWOjT9iKz0MNFq0g3mKepPEIozOYPTeHD1PhlufQNMmUY03PrHVxA=w300-h400) |
View of the back vent from the right side. |
![](https://blogger.googleusercontent.com/img/a/AVvXsEgYp9mJSXoO-Sg5mAK2UAULgYhLUjKh3Rafjug-CcQfmx5SSKbyVBS3Z9nDX7PBjzMBabnJpdB26QZQ50a_v6hGrBeEwGuaC3An0qlpt4bCqLwbQDAxasqJfwlYWl4Jwv7mtDTydwgGKk-DUyaSiUOcFylE8Jkzx8KPCNZscJKNID9Yvo7kx-A4nw) |
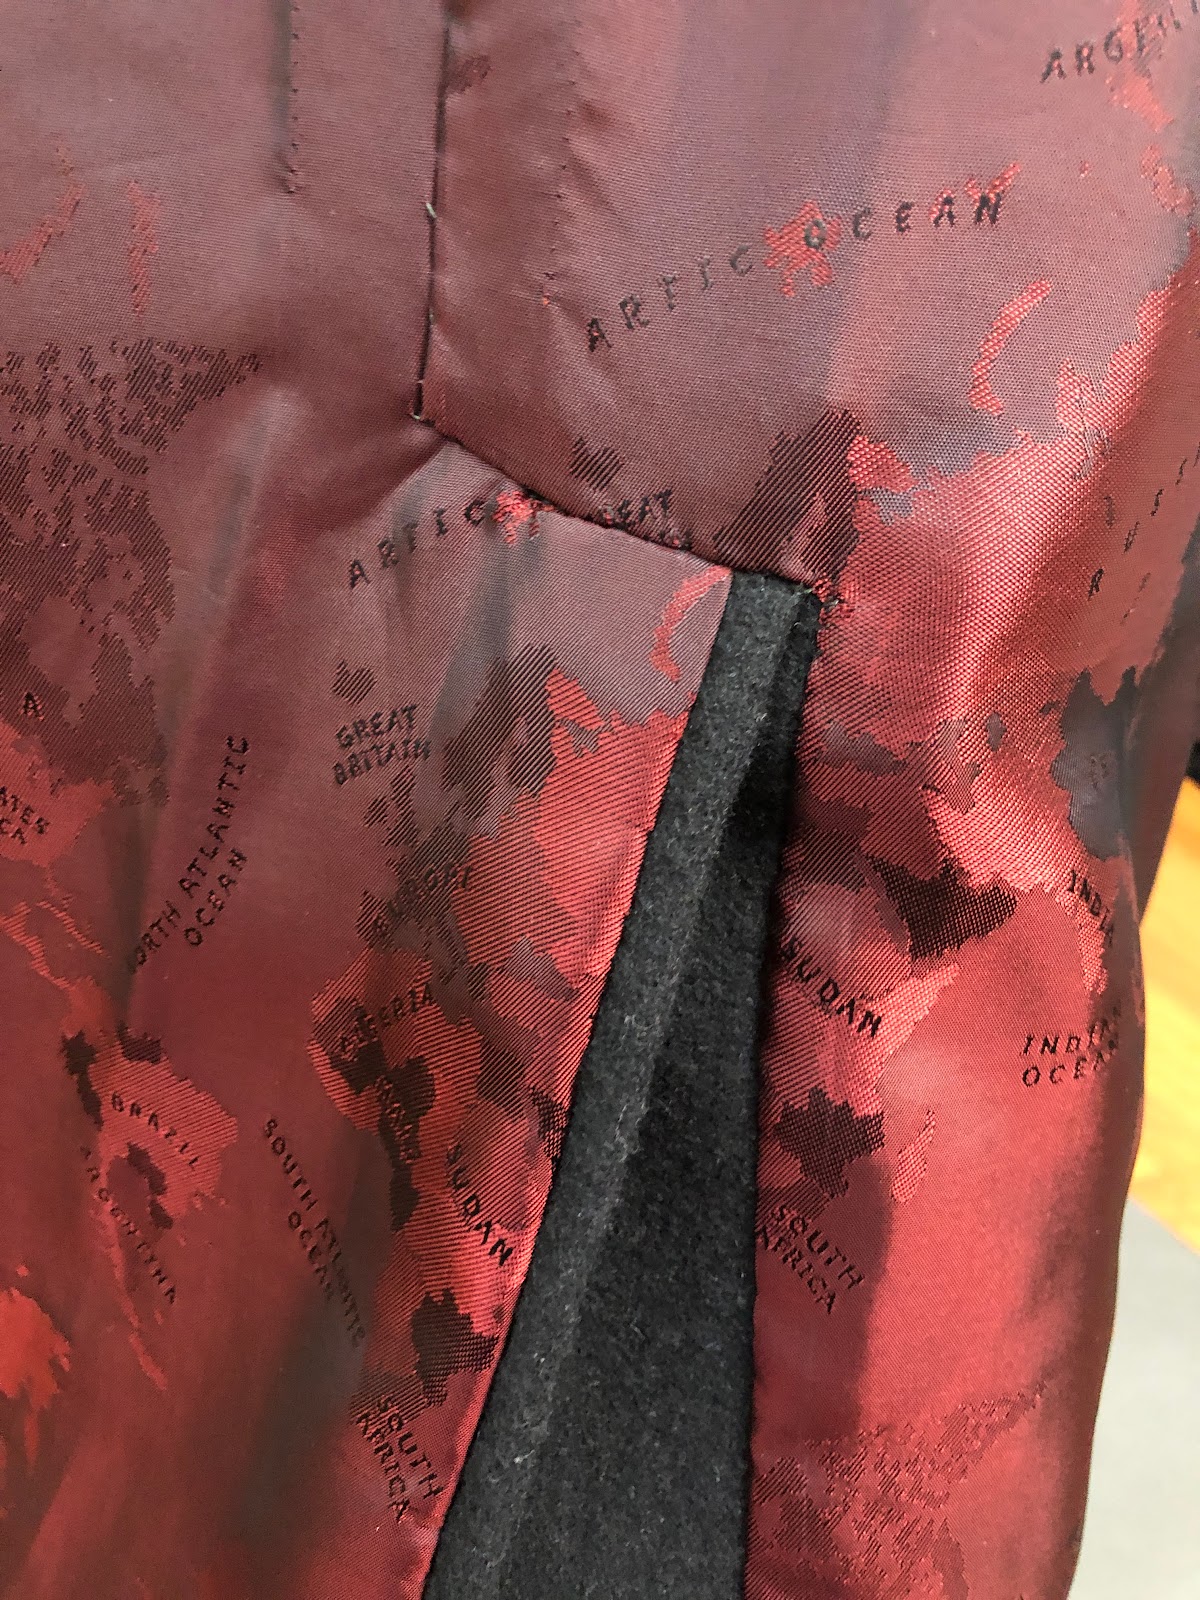
View of the vent from the wrong side. The lining was hand sewn to the main fabric using catchstitches. Before that could be done, I had to finish the main fabric vent first. |
![](https://blogger.googleusercontent.com/img/a/AVvXsEi5Cr9sUmOI0yH3jrStM4gr47j510ZoINzQ_EnXJLlSVWMXwp6XA158DXGFwhTJUpU8k7tSC91_Ikyuxor96lCDzu1B4kT17n3s4m6iSUpGAH80f8ffvPgYIgmMneFebWpXDFQV0wTCZKRMb_6JUI9XJORH0MKyGHs4jfw7UzTk05O4unLUlWI4kg) |
I mitered the corners around the vent. This one is on the left side which is the overlapping side of the vent. It has a narrower vertical seam allowance. |
![](https://blogger.googleusercontent.com/img/a/AVvXsEimzaxnWIk9KEvLhyZ9HN3Sxyn1NA-SOFv8cWyDa2pO30V8pMJWruXhnBSJ9VFMC3GKienSC_0_N9AshhBOduvhfFZDinH2VF10g9As5TbrRwfnAQ5C7HyonHpN5kGJEmLXTVMBdEoBDmV6yZd6TLbKQsdzrd3oHj8nBvAWPd0-sXfvvCA7K-RYLw) |
This one is on the right side. |
![](https://blogger.googleusercontent.com/img/a/AVvXsEg35IH20OlNj860P_uSghVWUCEX2KxXdmgwtIEjuPRAdSP4wBXbFHNUGrmIGZxy6WaIZvkyyJlGEz5dKHKiqcyb9QNIP8SMaIspzO1okxneid3uPWCrzxpA7p-d05tnmgQi7Q-7K0KDwIkyDyRJI4JUklpjtWMNsNu0NNiWayokAXRNyPNm8BqvGg=w300-h400) |
The lining pinned to the main fabric before being hand sewn. |
Close-up of Details:
The fashion side:
![](https://blogger.googleusercontent.com/img/a/AVvXsEgWGXW7yj6gfyeBak68JUGZ8NRDU-96gSCbGv_5omHqJNvElWzkhjFfLcBN7KvVdMGUJLsM4tvXkyZKkHRjv8NQeOyLJnKAPEX_LBtHnIg3UggX4_dao0h5RnTzokq75IcO0zkNDs0TW2dE3Ta12NSRkNbcnzMCfIFlZ_EBEKauk0n7ds_nLhnpZA=w300-h400) |
Pardon the underexposure as it was the only way to show the detail clearly on black fabric. The collar is asymmetrical with the right side being longer and having a sort of "tab" extension. |
![](https://blogger.googleusercontent.com/img/a/AVvXsEgTIsD7CD4dpczTh5EpSAx34YGs6bKbNft-FclLATGqvWYuIuZMgnu6FRpJkonPHSzs77pw5UbFuQ_ZrI3BHAcSp9fEchmGldAs9d8OvWa2FOD94jq31vRf0sfRIs5wqkyjab7jtBBdjwlTfJGTuwgDrdFnKr1AgGQdiRPI8I9V5IPqSe0b4XIL7Q=w300-h400) |
Flat lay view of the front lining/facing.
|
![](https://blogger.googleusercontent.com/img/a/AVvXsEiLYqQHGV4YBrtyznjMkFMrME8P6fMjm29258Sftsxg3tEuH_gSdDNPXtzhCFGk68XomOVX4I_p1u_C2UAb1KoLavYE0pvijtoQ1L1tNGzOMvSOiNO7lMqoXut7S_dFFM4X2cnIvnCi5-eu21FX4YX4k4tCdbcmIa-J2HKGRvJhlPmxt4iuO6qs_w=w300-h400) |
Closer look at the front lining with the facing. |
![](https://blogger.googleusercontent.com/img/a/AVvXsEi6MtsNEpVr_4lUpZtm_kdj5-vwQtDKWfA6BQFk97KzwfFO9b3W6qrNXXPG3Lpvzhmq6aRJjRxzYfDk3h4kvfnJkuBT4C-bGyq8E9YG9jerIi03IgoIUb1qNHDDbFMyoIcNBUaZ6JGycUO2n7HQ4_B4v03uNdwTtLxZy1tJPE8NvcM_orz-JszcIw=w312-h400) |
Flat lay view of the back lining with the center back pleat and vent. |
![](https://blogger.googleusercontent.com/img/a/AVvXsEj2qVkF21GFkDETc88gD7EghZZl6-u448Mnq-F4xBs5wYGCTk9qu9rwpPbtcnHlDVA3eM-mjNiD7cu0TmdKaIbytK3_-mcaAjrECNOw25ACYB8uCjVHq_I-mXV7s1dSgaZqWh-J3wiT6i-nxObhApVWmVgsv0O-qHhs1fDjvCbITBADYZA6cymnCQ=w300-h400) |
The special labels. "Tinahi ko ito" is a Tagalog sentence which means "I sewed this." |
![](https://blogger.googleusercontent.com/img/a/AVvXsEjeMtvCKIxZ5g-22Bf9eyGEMBgOgoN6vrTGarcIWx1vemWv1yRAlMSi2L8yFot_2jlu93F1ssUS7U4SZauZbF-sljqC2fYUmcOj8p4iFlNe7OAfFhEk4Wpn4kICyyZEIZx0D0GSCXkLbHCB_67OBWFozQxNqoR42Mua7Hrj4JRQoLtoNpLunveY5g=w300-h400) |
The lining hem constructed with a jump pleat. |
![](https://blogger.googleusercontent.com/img/a/AVvXsEirJeKlKe5be_QU8OlOu3pTUVBfklKWcqvxDx46M9X4CCeg6k4lUFVDSWIJTvGwbrnRZcH74wUWR2dw1PBwdubBorFRDYONdZutJs11njvpEmb96qk3VxXuwyymBDQPmU69eSaiajLLQKgOg84dOwwBPxvK4K-7FK5Bdrfm5m2V5BAuE81etETbHA=w300-h400) |
Junction of lining hem and front facing. Area was sewn down to the coat hem and then the rest of the lining hem sewn with a jump pleat as shown in previous photo. |
Modeling Shots
Views with collar and zipper closed.
Views with collar unsnapped.
A view showing that the coat can also be worn unzipped.
That's it! Hope you enjoyed this photo-heavy post. Hubby loves the coat and cannot wait to wear it. Just when he has a cozy wool coat to enjoy, it suddenly turned summer in the middle of winter in our neck of the woods!