I purchased a digital pattern from the Style Arc Etsy store and it is bundled in groups of three sizes. I bought size 4-6. Previous experience with this brand put me at size 6 but after sewing a muslin, I found the tunic too large overall so I tested size 4. It worked better but it was still too long. So I had to shorten it. However, this pattern did not have any shorten/lengthen lines and that was a bit tricky because of the piecing and diagonal seaming.
Shortening the pattern:
I drew my own "shorten line" perpendicular to the grain line. The first one was located 3 1/4" below the armhole. This was chosen arbitrarily. It was a location that would not affect the armhole or the diagonal seamline. I shortened here by 1".
The second shorten line was a bit more tricky since I placed it on the lower bodice section which consisted of several pieces. I avoided a location that would significantly affect the mitered edges. Then I "trued" the diagonal seam. For this part, I took off only about 3/4".
Overall, I repeated the process in all the pieces both front and back.
Construction Steps:
1. All pattern pieces are cut on a single layer of fabric. There are specific left and right sides so make sure to lay out the pattern pieces right side up on the fabric's right side facing up, too.
It is also important to transfer all markings as these would be helpful in matching diagonal seams.
2. After all pieces have been cut and before sewing anything together, make sure to finish the edges of all hem edges (front lower pieces and back lower pieces). Believe me, there is a reason for this!
See how after sewing the mitered corner it would be hard to serge the edges?
Topstitch the mitered corner hems leaving area near the side seams unsewn to allow you to join the side seams later on with ease.
3. Assemble the pieces by referring to the helpful diagram accompanying the pattern.
To achieve a nicely finished inside, after one piece is sewn to another, serge both seams together, press to one side, then topstitch.
A closer look at the topstitching.
4. Turn remaining bottom hem edges up and topstitch.
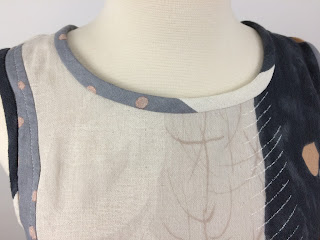
5. I skipped the sleeves and facing and opted to use my own bias binding.
I cut 2-1/4" wide bias strips from my fabrics to use as decorative trim for the armhole and neckline.
Finished garment measurements:
Center back length as measured from the neckline--25.5" (I shortened the original by 1-3/4")
Shoulder breadth--14.25"


Very nice tutorial! The tunic is so pretty with all the fabric combination.
ReplyDeleteThanks Vanessa!
DeleteWow! Thank you for sharing the details of this project.
ReplyDeleteSilk Dupione Fabric NYC