Monday, August 14, 2017

Burda 8987: Silk Version

As I mentioned in my most recent post, Burda 8987 is a definite keeper. Barely a week has passed and I already made a second version, this time in silk. 


I had less than a yard left of this beautiful Italian silk from Theory (purchased from Emma One Sock) and I thought the abstract design would work well with the bias cut of the pattern. I have sewn two other tops using this fabric pairing it with Butterick 5450 and Salme 150 patterns. 


To facilitate the pattern layout on this fabric, I duplicated the front pattern piece so I could lay it out as one whole piece. 

Because the main fabric was a bit sheer, I opted to fully line it with Japanese cotton voile in light ivory, also purchased from Emma One Sock. I just used the main front and back pattern pieces for the lining. That made it simpler because I was able to do away with using facing for the neckline and armhole.

Since this is such a simple pattern, I'm just summarizing a few construction notes worth remembering:

1. I did not want to use any markers on my silk fabric so to construct the bust darts, I followed my usual method for dealing with such fabrics. Details can be read in this previous post.

Using removable template for the bust dart. 

2. Because my fabrics were very lightweight, I used French seams to finish the side and shoulder seams. 
Trimming along the initial 3/8" seam for the French seam finish.
3. I constructed the main fabric and lining fabric separately, sewing the center back seams and shoulder seams separately. 

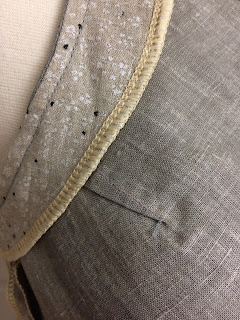
4. To attach the lining to the main fabric, I sewed the two pieces along the neckline. To finish the seam, I just used a double layer of straight stitches and trimmed close to the edge. 


5. Instead of topstitching along the outside of the V neck, I understitched to keep the lining in place. 


6. To sew the armhole edges of main and lining fabrics together, I used the "burrito" method. This was done by aligning and sewing the armhole edges of the main and lining fabric one side at a time with the rest of the top sandwiched in between the two layers. 


7. After the neckline and armholes were constructed, it was easy enough to finish the side seams. 

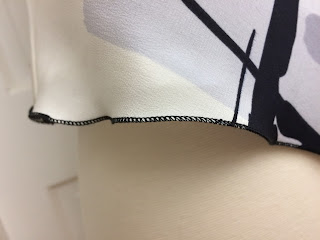
8. For the bottom hem, I opted to sew a rolled hem using my serger. For the lining I just used a double narrow hem. 


My Juki MO 654DE has a built in roll hemmer. I only had to follow the rest of the instructions and didn't have to fiddle much with the tension settings at all to achieve a nice hem. 

Use only the upper looper, lower looper and right needle. 

Set the lower knife adjusting knob at 1-2. 


Turn the overlocking width selection knob to align with the red marking on the throat plate. 

Set stitch length to 1-1.5. 

One thing to remember is take note of the previous settings before adjusting everything to the roller hem settings. 

For the tension settings, I used 5 for the right needle and lower looper, 8 for the upper looper. I tested first on a small piece of main fabric scrap. 


Needless to say, this won't be the last version. Maybe for next time I might lengthen the hem to make it a tunic. 


Tuesday, August 8, 2017

Burda 8987: Easy Bias Top

It's still summer where I live so I'm quite excited to be able to sew something that will still work with the current weather.


Burda 898


This pattern was brought to my attention by one of the Pattern Review website members (Elona) when I posted in the forum asking for ideas on how to duplicate an RTW draped top.


I was inspired by this J.Jill linen top. I had a chance to visit a brick and mortar store and tried it on. Unfortunately, it did not look as nice on me as it did on the model so I scrapped the idea of  duplicating it. However, the suggested Burda pattern really caught my eye and I thought it was a perfect pattern for my lovely Japanese linen fabric. 

Pattern

Burda 8987 is already out of print but I was able to find a copy on Ebay. It is rated start 2 meaning "little sewing experience" needed. Being a paper pattern, it has 5/8" seam allowances included. My envelope contained multiple sizes from 34-46 (equivalent to US 8-29).

The pattern is for a bias cut sleeveless top with V-neck or round neck options. It works best for woven fabrics like linen, silk or rayon.

Unlike the big Four patterns, I find Burda sizing more accurate to my body measurements and I don't need to size down. Based on my bust measurement, I made a muslin in size 34 and was delighted to find out no alterations were needed.

Fabric


I used a Japanese linen with border print on sides along the lengthwise grain. 


I wanted to use the border print as the hemline of my top and since the front and back pieces were supposed to be cut on the bias, I had to be creative with my pattern layout. The front pattern piece was also drafted to be cut on the fold but laid out across the bias. I cut it into two across the center and just added 5/8" allowance. 

Sewing details

This top is really an easy project as stated on the envelope. There were only two main pieces (front and back) and the rest were facings (for the armhole and neckline). 


As shown above, I serged the raw edges except on the front and center back seams because I didn't want to add bulk to those areas. Since they were cut on the bias, I wasn't really concerned much about fraying. 

Center front seam.


Fit: 

As mentioned above, I was able to sew this top without any fitting alterations which is a plus because normally, I would have to shorten bodice length on tops or dresses because of my being short-waisted. In the pattern envelope, the top looks really short as modeled. Other reviewers also noted the bodice being too short on them. But for me, it was the perfect length. As measured from the base of the neck, the center back length of the finished top is 19".


Chest: 35 -3/4"
Bottom sweep: 36 -1/2"


This pattern is definitely a keeper!