Pattern Layout
I use one of two methods:
Spraying the fabric with starch spray stabilizes it for cutting. However, make sure to test a small piece first to see how it will affect your fabric. I hesitate to use this on more expensive silk types but have tried it on polyester fabrics that where washable and it worked well.
Another alternative is to lay down the fabric on a large piece of tissue paper or gift wrapping paper before cutting. I have used this method on my silk fabrics. I used my finest pins to secure the fabric to the underlying paper.
Marking
This is one of the steps I used to struggle with. I can't use chalk markers or tracing papers on some of my fabrics because they are not washable and I didn't want to leave any permanent marks. So that leaves me with no other option but to use tailor's tack. However it is not as easy if the fabric is slippery. So I figured out a way to do this with the help of an iron-on, tear-away stabilizer.
I have this brand called Totally Stable.
This example shows how I used the stabilizer to help me trace the marking for the bust dart.
I traced the dart shape from my pattern to a piece of Totally Stable and cut it out accurately. I then ironed it lightly on the fabric. The goal is not to permanently fuse the stabilizer but just to adhere it enough that it won't shift.
Then I thread-traced around the perimeter of the dart.
See how the darts have been transferred to the fabric without using any staining markers?
Then I just folded the dart by aligning the thread guides.
Seams
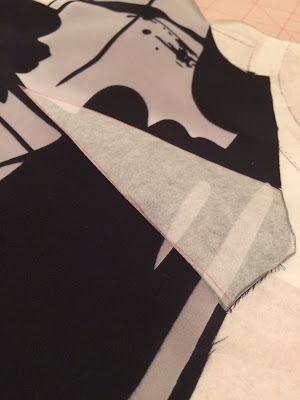
More often than not, sheer fabrics don't take to heat too well so it is sometimes tricky to press seams open. If French seaming has not been used and seams need to be flat and open, an alternative is to underline the fabric and use catchstitches to sew the seam to the underlining.
Two photos above show a silk blouseweight woven fabric underlined with silk organza.
If underlining is not an option, finishing the seams by serger or sewing machine is something to consider.
I used wooly nylon thread on both upper and lower loopers of the serger to achieve a softer look. Claire Shaeffer mentioned in her fabric guide book that doing this prevents thread imprints that can be visible on the right side.
An alternative to serging is using the overcasting feature of a sewing machine. In my Juki HZL F600 no. 8 is perfect for lightweight fabrics as seen below.
Hem
For narrow hems, there are two options:
1. Sew a guide with the machine using long machine stitches and looser tension (to make it easier to remove later on). I use this guide to fold accurately .
2. Use a strip of fusible sewable web like Heat n' Bond Lite along the hem seam.
Finally, the basics:
1. Use the finest universal needle for the sewing machine (60/8 to 70/10).
2. Use shorter stitch length.
3. Keep tension loose and balanced.
4. Ideally use mercerized cotton thread because according to Claire Shaeffer, it is weaker than silk fabric and will break at stress points before the fabric tears.
Below are samples of some silk tops I have sewn:


With your careful work you have created some lovely, elegant garments. Your dart marking technique is stellar; I hope to remember it.
ReplyDeleteThanks Carol! That's why I decided to blog the techniques because I tend to forget them myself!
DeleteSome great tips here. Thanks.
ReplyDeleteI'm glad you found them helpful!
DeleteThat dart marking idea is brilliant. Thank you for sharing.
ReplyDeleteThanks Ann! I'm glad you found it useful!
DeleteI appreciate all the information that you share. Thank you
ReplyDeleteGlad you find this helpful! Thanks for taking time to read my post:)
DeleteGood!
ReplyDelete