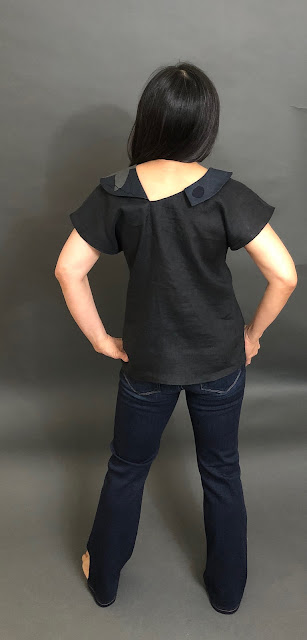
The Antwoord Top features an asymmetrical collar with cut-out half-round neckline and extended shoulders. I have posted a detailed review of the pattern at PatternReview.Com. This post will focus on the construction aspect of the garment focusing on the trickiest part which is the neckline.

The top itself is very simple to make. It has only three pattern pieces--the bodice (which is a single piece that include both front and back already), the neckline facing and the collar.
Pattern Pieces
The bodice piece is such a clever design. It is cut on fold and that is how the front and back are created. There is no shoulder seam, no hole for neckline, no sleeves.


This is the collar piece and it is cut twice. I only interfaced one of the pieces. The photo is that of the muslin version I made. Next photo is the actual contrast fabric I used which is left over from a previous project.
 |
 |
Transferring Markings
This part may be a bit confusing. The single pattern piece which is laid out on the fold of the garment does not have any specifications as to front, back, shoulder, etc. The only markings included are for the neckline facing attachment and although one is labeled front and one labeled back, they are both located on the same piece.


Some useful tips
Reinforce the corners with tiny stitches and square piece of silk organza prior to slashing.

Mark the center of the markings to serve as guide for cutting.


Clip curves before turning facing out.
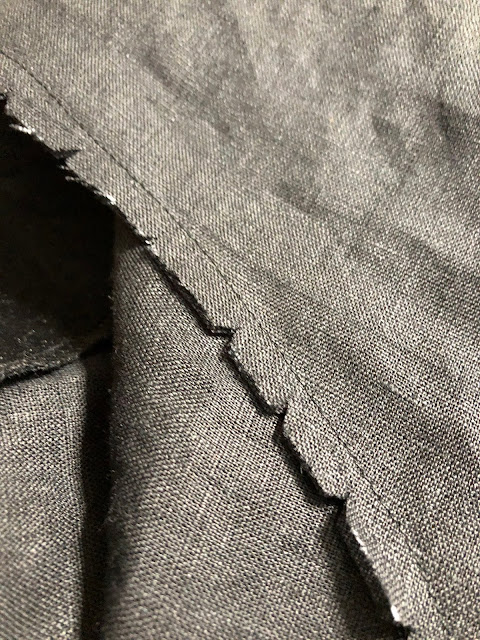
Here is a view of the half round neckline after facing has been turned.


And now for some photos of the finished garment.


You are so creative and talented. Love all your works of art!!!!
ReplyDeleteThank you so much!!!
DeleteWow! that is quite creative and it is brilliant that you got it all figured out. Thanks for the detailed information. I am tempted to try the pattern but a bit scared too. ;-)
ReplyDeleteThanks so much for the kind words! The most confusing part is just the tracing and construction of the neckline and facing. Once you figure that out, it's all straightforward sewing. I hope you give it a try! Maybe test run on a cheap muslin fabric:)
DeleteThis is an amazing design. I love unique and different styles and you did an amazing job explaining how you figured things out. I am going to add this designer to my Independent designer list.
ReplyDeleteThanks so much Terri! Same here, I love unique styles!
DeleteWow! That is really interesting. Brilliant design and you wear it beautifully.
ReplyDeleteThanks so much! I'm really amazed at how the designer came up with that unique collar and was able to translate it into a pattern!
Delete