 |
| Jalie 3245 Raglan Tee, Racerback and Tunics |
This project could easily have been a one-hour or less project. There were only four pieces--front, back, armhole and neck binding.


So how come it took me one whole afternoon to finish it? Let me start with the fabric.

I had this beautiful warm mauve rayon jersey from Gorgeous Fabrics. It was really soft with a lovely sheen.

There was some rolling on the selvedge but it was manageable.

As with most knits, finding the straight grain can be challenging. My plan was to layout the pieces the usual way--on the folded edge.

But I decided it was better to cut the pieces on a single layer of fabric. To do that, I just had to retrace the pattern pieces for the front and back and tape the corresponding halves together.

Had to use lots of pins before cutting the fabric.

Here are the cut pieces.
It should have been smooth sailing after this. Just sew the shoulder & side seams then attach the neckline and armhole bindings.

But the fabric was quite sheer. I thought I could just wear tank underneath but I realized it was a racerback cut so I wasn't sure how that would look like.

So here comes another sheer fabric I found from my stash.

I decided to line the mauve jersey with this black knit.

I cut the side seams following the original pattern.

But when it came to the armhole, neckline and hem, I added an extra half inch to the seam allowance.

I put the original fabric on top of the lining fabric. You can see the extra fabric around the neckline and armhole.

This is the part that ate up most of my afternoon. I wanted a raw edge finish to the neckline and armholes so I used the coverstitch machine to sew the two pieces together. But, no matter how much I fiddled with the settings, I could not get rid of the "tunneling." That was not the look I was aiming for.

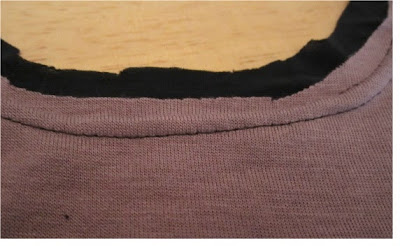
After sewing and ripping, ripping and sewing, I finally gave up and went back to my good old regular sewing machine. I just stared at the list of decorative stitches on the dashboard and randomly chose no. 43.

Hmm, I liked how it looked so I decided to go for it.


Close-up views of the neckline.

The armhole.

I didn't sew the hemline pieces together.

Originally I was planning to cut leave the black lining longer but I had an accident with the sharp scissors and ended up cutting the two fabrics same length.

The decorative stitch gave the hemline an almost rolled hem effect.

Here is the completed project.

Back view.

Paired with the maxi skirt from previous post.

And me, styling it!
What should have been a simple project was complicated by my own doing but it all turned out for the best!
No comments:
Post a Comment