 |
| Four-panel Screen Divider |
primarily built to serve a purpose. You see, there is a big corner in the living room that is begging to be used as a hiding place for my boxes and bags of fabrics. The divider effectively camouflages that corner.
It turned out to be a relatively easy project. The whole assembly took less than half a day. The hardest part was choosing the perfect fabric and waiting for the right time to buy it (in other words, waiting for promotional sales).
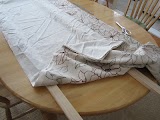
In a nutshell, this D.I.Y. project involves building four separate panels and connecting them via hinges so the panels fold in an accordion fashion. Each panel is just made of a wooden framework covered with fabric. It is like a magnified version of the artist canvas. Depending on the size of the room and one's needs, it can easily be tweaked to a three-panel divider, a five-panel, and so on. The width and height of the individual panels also depend on one's preference. The materials and procedures that follow are applicable to the four-panel screen divider pictured above.
Materials:


#8 1x2-6ft select pine board
#1 1x2-8ft select pine board, cut into 8 equal pieces
#3 2-pack 2.5" non-removable pin hinge brass
#4 4-pack 2.5" flat corner brace brass
staple gun
fabric
Phillips screwdriver or power screwdriver
Pin, marker, clamp, scissors, iron
 |
| Lay out the wooden framework. Pre-drill holes prior to screwing the braces. |
 |
| Using the flat corner braces to connect the wooden boards, assemble the framework each panel. |
 |
| I initially tried using inside corner brace but it was less stable. |
 |
| Measure and cut the fabric for each panel. |
 |
| Iron out all wrinkles. Set aside. |
 |
| Prior to stapling fabric to framework, assemble the "skeletal" panels first by screwing the hinges first. Do not tighten too much as these will be removed again before stapling the fabrics. |
 |
| I used a pair of hinges to attach two panels together. |
 |
| Bring one assembled pair of panels upright to see which direction it folds. This will determine how the next pair of hinges will be attached. |
 |
| If done correctly, the panels should fold in an accordion fashion. Unscrew hinges and attach fabric one panel at a time to make it easier to reassemble.    
If available use clamps to hold fabric taut while stapling.
 
Start stapling on wrong side of wooden framework.
  
When you reach the point where hinges were previously screwed,
mark the area on the fabric using pin and pen.
 
Reattach the hinges. Set panel aside and work on next panel.

Connect two finished panels.
Voila! Here is the finished product!
 |