Monday, September 16, 2013
Mini-Wardrobe Contest Day 16
I have finished two garments and almost done with third but sadly I have to put this project aside because of a family emergency. When things get back to normal, I will just post reviews of the three finished garments.
Thursday, September 12, 2013
Mini-Wardrobe Contest Day 9 Garment 1
I just finished my first garment for the four-piece collection.
It is a simple top made out of a cotton silk voile with big bold print.

 |
| Simplicity 1693 |

Although the pattern was simple (in fact there were only two pieces for this view),
the print of the fabric and the sheerness necessitated special handling.
 |
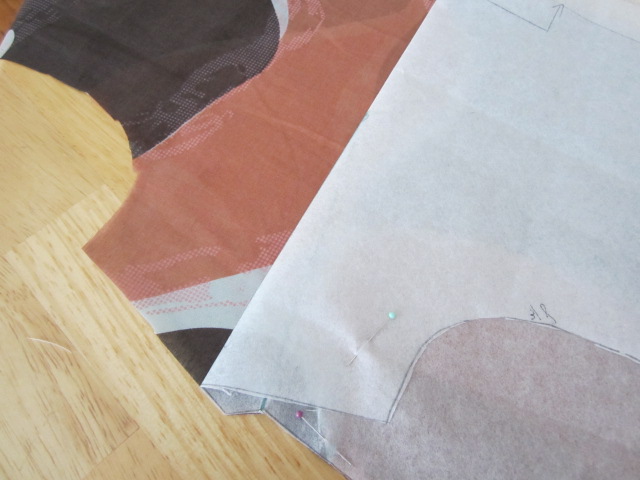
| I had to pay special attention where I laid out the pattern pieces. |
The front piece has bust darts. A regular marker and tracing wheel could damage the fabric
so I decided to thread trace.
 |
| I pinned the pattern below the dart location. |

 |
I folded the pattern paper along the upper line of the dart.
|
 |
| Using cotton thread and fine needle, I hand sewed loose running stitches along the folded edge of the pattern. The loose stitches resembled small loops. |
 |
| I gently pulled the top and bottom fabric along the thread-traced edge. |
 |
| I carefully cut along the middle of the exposed loops of thread. |
 |
 |
| Running stitches were visible in both sides of the fabric. |
 |
| I repeated same step with the lower edge of the dart. |
Thankfully there were not a lot of the markings, just one for the center back opening.
I just used tailor's tack to mark it.


Before sewing, I made sure to replace my sewing machine needles with the appropriate ones.
 |
Since the fabric was sheer, I opted to use French seams.
 |
| Unlike with regular seams, French seam starts with sewing the two fabrics wrong sides together. |
 |
| The first seam was sewn with 1/4" allowance. |

Since my fabric was cut on the selvedge, there was no raveling to worry about. Otherwise, I would have to trim before proceeding to next step.

I pressed along the seam.

A smoothly pressed seam made for a smooth French seam.

I sewed using a 3/8" allowance on the wrong side of the fabric, enclosing the 1/4" seam that was first sewn.


Finished seam. No raveling or serged thread visible.
Although not included in the instructions I opted to use sew-on stay tape where I thought it was needed.

Stay tape

 |
 | |
|
 |
| I also used it on the shoulder seam before proceeding with the French seam. |
The neckline and armholes were finished by using 1/2" single fold bias tape. I opted to make my own using the handy dandy Clover bias tape maker.


I used leftover scraps of silk habotai for my bias tape.

I basted before sewing the bias tape along the neckline edge.

Understitching helped make sure the bias tape didn't show through on the right side.

View of attached bias tape from the inside.

View of the finished neckline from the right side.
Bottom was finished using narrow hemline.

I machine basted along 5/8" seamline of the bottom edge.

It was easy to fold along the stitched edge.


I made the narrow fold along the 5/8" inch edge while sewing.
For the back closure, I used a 3/8" button I found from my stack and sewed a loop closure for it.


That's it! I'll post pics of the finished top soon. Meanwhile I have three more garments to sew.
Sunday, September 8, 2013
Mini-Wardrobe Contest Day 8
After signing up for this contest four days ago, I excitedly shopped for fabrics from my own stash. One thing I was already sure of was I was going to finally sew a jacket out of the beautiful boucle fabric I purchased two years ago from Elliot Bermann Textiles. The thumbnail below does not do it justice. It is a combination of black, ivory, coral and red.
 |
| J. Crew Tweed Fabric |
The color hues in the fabric are one of my favorites and just perfect for fall. That made it easy for me to decide on the other complementary fabrics to use.
 |
So with these fabrics in mind, I pulled out some patterns.
 |
Vogue 7975 and 8804 are patterns that mimic the classic Chanel boucle jacket.
|
 |
| Some possible patterns for the other fabrics. |
My initial plan for the mini-wardrobe was:
Tweed jacket
Top
Pants
Dress
After spending the last two days sewing muslins, I had to change my game plan.
The jacket is still a go but I decided to use Vogue 7975 as base pattern and Vogue 8804 for instructions. The latter, although chock-full of great couture tips, just wouldn't work for my body type. I might have to scrap the pants as I have never sewn one and the muslin I created looked terrible on me. I am not sure if I have time to find the perfect fitting pattern. I still need a bottom so I might have to go with a skirt. As for the dress, I am inclined to scrap that too and make a cardigan instead. This is a work in progress so we'll see what happens! I just hope I finish all four garments in time.
Thursday, September 5, 2013
Mini-Wardrobe Contest
After wrapping up my summer sewing, I have decided to join the Pattern Review Mini-Wardrobe contest.

This is a contest to create a 4-piece wardrobe in 4 weeks. It commenced September 1st and ends September 30. Although the $100 gift certificate is a good incentive, I am more excited with the prospect of creating a fall wardrobe from my stash of fabrics and patterns. Win or lose, I will end up with some new outfits for fall. If my daughter were here, I would definitely create the wardrobe for her but it's hard to sew if my model is not available for fittings. Anyway, I'll be blogging about my progress in real time. Hope you can join me and cheer me on!
Summer Sewing Wrap Up

There are three reasons why this pattern worked so well for my body type (petite, short torso, small chest):
- The pleats on the bodice front and back. Without these pleats, I usually end up with gaping around the neckline.
- The empire waistline. The high placement of the waistline eliminates the need for me to grade up in the pattern size when cutting the skirt section.
- The absence of bodice darts. The bodice cut is perfect for small breasted women like me.
With that said here are the modifications I made to make this pattern really perfect for me:
- Darts. I did not cut the skirt darts open as called for in the instructions. Since the skirt was left unlined, I did not care too much for the unfinished mess a cut dart would leave. I pressed the darts toward the center.
- Zipper. I used invisible zipper instead of regular zipper. This made for a flawless result on the left side seam.
- Lining. I added skirt lining to two of the dresses as the fabrics used too sheer for my taste.
Tools and Techniques Used:
Dubbed as "fast and easy," this pattern was made faster and easier with:


This foot is intended for machine applique or embroidery but I also find it useful for understitching as it gives me an unobstructed view of the seamline while sewing.


Open Toe Foot


This foot is intended for machine applique or embroidery but I also find it useful for understitching as it gives me an unobstructed view of the seamline while sewing.
Blind Hem Foot

This has made hemming faster and painless! After fiddling with the machine settings, I found the combination that resulted in invisible stitches on the right side of my woven fabric and made sure to note them down: 2.0 for the stitch width (height of the zigzag stitch), 3.0 for the stitch length (distance between stitches) and 3 for the tension.
Presenting the finished projects:


Subscribe to:
Posts (Atom)