Friday, November 26, 2021

Celebrating Pattern Review's 20th Anniversary


PatternReview is turning 20 this November 28 and as a long-time member I am so excited to celebrate with the rest of the global community!

20th Anniversary Contest

For this contest, participants are asked to make a top/shirt/blouse/tunic or dress inspired by Pattern Review. My so-called "milestone" top is inspired by all things related to the Pattern Review website. I decided the best way to show this was by designing my own fabric. 

Presenting my designer top with a touch of whimsy!

If you have been reading my blog or checking out my pattern reviews, then you probably already recognize the pattern I used for this top. That's right, it's Vogue 1693 by Issey Miyake. 

I first made this pattern in May of this year and in a span of six months I have sewn six versions! Can we say TNT (tried and tested) pattern?

I thought the pattern was the perfect canvass for embellishment and personalization. 


If you notice, the right and left bodice of the top are vastly different. I am crazy about calligraphy and maps on fabrics so this was my chance to combine my two favorite design elements and do it in a very personalized way. 

For the right side, I printed words and phrases on the base fabric (linen blend) and all the words were taken off the Pattern Review website. So upon closer inspection, you will see the names of the different contests, the  forum topics, site features and more. 


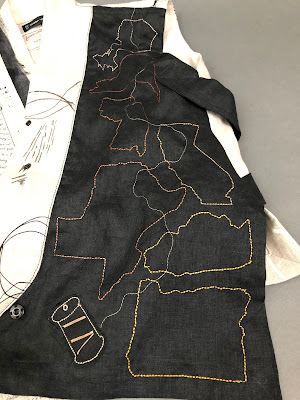
For the left side, I embellished a black handkerchief linen with outlines of the states where PR weekends were held in different years like Texas, LA, Oregon, NY, etc. I added an applique of a thread spool and stitched a thread coming from it to loop through all the different state outlines, sort of representing "the thread that binds the sewing community."


So if you are interested in the creative process behind these designs, just read on.

Printing on Fabric:


1. Word Document. On Microsoft Word, I created a document of several pages consisting of random words and phrases taken from the PR website. I experimented with different fonts and sizes and eliminated punctuation marks and margins. I initially printed on paper to see how it would look. 

2. Fabric Prep. The fabric had to be treated with a special solution called Bubble Jet Set 2000 for HP (since my printer is Hewlett Packard). This is readily available at Amazon, Jenkins or Dharma Trading.  There is also a solution specifically for Epson printers and a solution for all other printer brands. 


I precut my fabric into same size as my printer paper then soaked the pieces in the solution for 5 minutes after which I let them air dry. 
3. Fabric printing. After fabric pieces were dry, I ironed freezer paper shiny side to the wrong side of the fabric then fed them individually to the printer to avoid paper jam. 


 Printer in action!


4. Fabric piecing. After ink was dry, I sewed the fabric pieces together until I had enough yardage to accommodate the pattern piece I was cutting. 


Fabric pieces sewn together. 

Wrong side showing how the seams were finished with zigzag stitches. 


Right bodice pattern laid out on the fabric. 


Right bodice cut. 

To ensure the print stays on fabric, it is recommended to use Bubble Jet Rinse for washing. 

Embellishing on Fabric

1. Word Document. I copied and pasted free online images of my chosen state map outlines, printed them on paper, cut then traced them to my fabric using heat erasable pen.


2. Sewing. I used Totally Stable stabilizer underneath the fabric before sewing on the embellishment. For thread I used Sulky polyester embroidery thread for the top and Gutermann all purpose polyester for the bobbin. I used long triple stitches to make the stitches stand out. 


I won this set of gorgeous embroidery threads for Sewing Bee 2019. 


3. Applique. For the spool of thread applique, I traced the shape on a black piece of linen fabric that was backed by a stabilizer, cut and sewed on it then used applique machine stitches around the shape to attach it to the main bodice. 


So there you have it, the process behind the fabric design. For the back of the top and the front band, I used leftover linen (Nani Iro At Random).


Unlike my past versions, I totally eliminated the use of buttons and buttonholes and opted for sew on snaps. I added a decorative nonfunctional statement button to the front. 


Here are additional views of the finished top.


And for icing on the cake, I created a special tag to commemorate the occasion!

For a complete review of this garment, check out PatternReview.com


Wednesday, October 27, 2021

Boiled Wool Jacket: Schnittquelle Jacke Wien 03-11

 Three years ago, I  was browsing online looking for ideas for my stash of boiled wool fabrics. They were mostly leftover from previous coat projects. My search led me to a German website called Schnittquelle. I decided to give it a try and purchased a paper pattern for an asymmetrical unlined jacket

Although the instructions included with the pattern are written in German and not accompanied by any illustrations, anyone with some experience sewing jacket or coat will be able to figure out the construction without much difficulty. Thought I'd share the step-by-step process.

Fabric: 

This is the boiled wool from my leftover stash. I purchased this from Mood 
Fabrics several years ago. It is 60% viscose/40% wool. It does not ravel making it perfect for lapped seam construction which I used for this project. 

The thing about this fabric is it does have a nap although it was not that obvious. Still I decided to carefully note it when cutting my pattern pieces. Above is a note I pinned to my fabric before storing it so I would remember what direction the nap is. I also cut my pattern pieces in a single layout--right side of pattern piece facing up over the right side of the fabric. 

Notions:

Needle: universal size 80/12

Thread: Guttermann Mara 100 Polyester

Walking foot 

Heat erasable pen 

5/8" curved ruler

These two notions made the process of lapped seam construction much easier.

Construction: 

If you do not want to do lapped seam construction, you can always substitute regular sewing while still following the chronological steps to make the jacket. If you want to use lapped seams, I highly recommend reading Kathryn Brenne's detailed tutorial on it. You can find it at Emma One Sock website. 

 1. Sew the bust darts on the two front pieces. 

For lapped seams, I sliced open the dart along the upper leg and then overlapped it along the marking for the lower leg of the dart. Then I edgestitched with tiny stitches. 

The darts after they were sewn. The larger piece is the right front and the smaller piece is the left front. Obviously they are asymmetrical!

Right side view of the dart. 

Inside view of the dart. 

2. Sew side front to front. Do the same with the back pieces. 

Note that the notch on the side pattern piece matches with the bust dart.

The succeeding photos below will give you an idea of how the lapped seam is made during the particular step of the construction. 

Mark the 5/8" seam allowance using erasable marker. 

This curved ruler has a 5/8" width so it makes marking much faster. 

Trim off the edges along the marking. Do this only on the piece that will be overlapped, in this case it is the front piece that will overlap on the side piece. Use the marking as guide. 
Pin then sew.

Using a walking foot made it easier to do edge stitching as I could see clearly where I was sewing. In this case, I used the inner edge of one side of the foot as my guide. 

3. Reinforce shoulder seams. 

This part was not included in the instructions but I followed Kathryn's tutorial where she used boiled wool so I did the same!

I fused a knit stay tape to a 5/8" strip of self-fabric the length of the back shoulder seams and sewed it within the seam allowance of the back shoulder seam. 

4. Sew side seams of front to back. For lapped seams, front side seams will be the overlapping layer so they will be trimmed off. 

5. Sew sleeves.

   5a. Sew the dart on the sleeves. 

Dart overlap.


   5b. Sew the cuff to the sleeve hem. 

View of the sleeve hem pinned to the cuff. I love that the edges are not straight but have a nice curved shape. 

   5c. Sew the sleeve side seams together. 

I had to baste the seams before machine sewing because as you will see below it was challenging to sew the side seams through a small hole!

Yes, that's edge stitching the overlapped sleeve seams through the sleeve opening. 

The finished sleeves.

Closer view of the sleeve and cuff. 


6. Sew the sleeves to the body making sure to ease in the sleeve cap. 

7. Sew the collar. 

This is the easiest collar on a jacket that you will ever sew! 
I did not use lapped seam here but followed the original instruction.


The right side of the collar is facing the wrong side of the jacket. 

A view of the right side. You will see the collar is inside. 

After it is sewn, the collar is flipped to the right side and the seams are hidden underneath the wide collar. 

See the seams that have been pressed open?


One clever thing about this pattern--the buttonhole is just a gap left in the collar seam.


Ant that's it! There is no need to finish the cuff and bottom hems or the front edges. 

And now for some eye candy!

View of the right side of the jacket seams--side, princess and dart.

View of the shoulder and armhole seams. 

Sleeve and cuff.
Small piece of self fabric to reinforce the button from the wrong side.


Finishing touch. 


View of the inside. 


For additional details on the sewing pattern itself, kindly check out my review at PatternReview.com.