For this round, we were asked to add surface embellishments to an existing fabric/fabrics to make a piece of fabric/fabrics truly unique. We were then asked to make a garment out of that embellished fabric/fabrics.
There were so many embellishment techniques I wanted to try but with only ten days to complete the challenge, it was not the time for me to experiment into the unknown. So I knew right away what I wanted to do. A couple of years ago, I came across a Threads Magazine article (March 2012) on how to apply strip-piecing to make a garment. This method is commonly used in quiltmaking and it involves joining two or more large fabric panels and then cutting them into strips of varying sizes. The strips are then sewn together in a staggered fashion to create a unique design. I have done this before but on a wider scale to sew borders for my quilt hangings and to make some minky blankets. It was my first time applying this to a wearable garment.
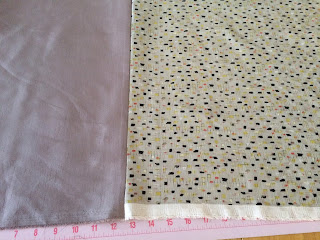
I used three fabrics for this project. My main fabric was a solid double-faced polyester shantung in a lovely taupe shade called "latte." It had a shiny and a matte side and I decided to use the matte side for the right side of the garment to make it more versatile as far a wearability was concerned. I also used printed multicolor silk from my stash, a leftover from a previous project. Finally, I added a sheer crepon polyester made of nylon with a very subtle sheen and in a shade similar to the shantung.
I sewed the sheer nylon to the shantung to create one design.
I sewed the printed silk to the shantung to created another.
So I ended up with strips of joined fabrics varying in width from 1/4" to 3/4".
A sample of how I joined the strips together.
I used 1/4" seam allowance to sew the strips together.
To make it easier to determine how to cut the bodice patterns, I used a transparency film.
And traced the design on the wrong side of the fabric.
Using McCalls 5927, I sewed a dress to show off the modified fabrics and here are pictures of the finished garment.
I also followed some couture methods when sewing the dress. I underlined everything--the bodice to provide stability to the stripped pieces, the skirt to make it more substantial. Underlining also enabled me to catchstitch the seams open since I could not press them open with high heat. I was able to achieve a truly invisible blind hem stitch by catching the hem stitches to the underlining fabric instead of the main fabric. I used invisible zipper and hand sewed the lining to the zipper allowance to make sure it didn't get caught in the zipper teeth.
This was such a learning experience for me not just in terms of the sewing process but also with regards to the various embellishment techniques. I invite you to visit Pattern Review and check out
all the wonderful entries in this round. I promise you it's a treasure cove of creative ideas!


Oh, that is SO pretty! The subtle coloration makes it elegant, to my way of thinking.
ReplyDeleteI absolutely LOVE this effect. I certainly hope you won the prize for special fabric effects - and if there was no specific prize, they should have created one just for you!!!!
ReplyDeleteThanks so much Miss Sunny Dee! There was indeed a prize for each round but I didn't win any. But lovely encouraging comments like yours make me feel like a winner!
Delete