It has been a while since I posted here. Most of the garments I have recently made were from tried and tested patterns so I did not feel the need to elaborate on them though I have shared photos on Instagram (my handle is finishedseams) and Pattern Review (where you'll find me as MVi14). However, this latest project was a bit more challenging in terms of construction and so I thought I would share some details worth noting.
Here is a look at the finished jacket to give you an idea of what the end result is.
 |

The Pattern:
I downloaded the PDF pattern from Burdastyle. I tried searching for a printed pattern version but could not find any. There are only five sizes included in the file (36-44) and they are nested. One does not have the option to choose a specific size to print unlike more modern PDF patterns. Seam and hem allowances are not included but the instructions include suggestions on how much allowance to add. The instructions also include the size chart to help one decide which size to use.
This jacket pattern has a total of 18 pattern pieces. These do not include the tabs, belt, waistbands and welt pieces. Measurements for those pieces are provided, no pattern pieces for them.
The required yardage and notions are listed under "Materials" but the exact length of the zipper for the specific pattern size is mentioned within the instructions themselves. It is worth looking for it so one does not have to shorten the zipper since it is easy to order the exact length online. I bought mine from Pacific Trimming which provides the option to customize length.
Construction:
Looking at the line drawings helps one envision the process that will go into the jacket's construction. Just like any jacket or coat, you sew front to back bodice, neckline (collar), sleeves then lining and then assemble them. It sounds simple enough. However before one can do that, one has to deal with whatever design details or features that need to be incorporated into the basic structure.


Here's a simplified breakdown of the process:
Jacket Shell
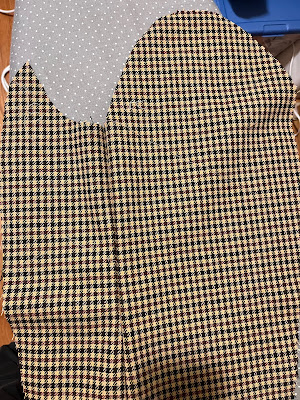
1. Make the front. The front is made up of a main center piece and a side front. The right has a flap and both sides have pocket flaps. What cannot be seen from the line drawing is the single welt underneath the flap.
i. Sew the welt: Just fold the welt piece in half lengthwise and align the raw edge to the raw edge of the front where the pocket is supposed to be attached.
 |
| This is the pattern piece for the right front of the jacket. Note the sharply angled side. |
 |
| Just center the welt piece over the attachment area since there are no markings to help. |
 |
| Welt turned up and pressed. |
 |
| View from the wrong side. |
ii. Sew the pocket bags. Below are several photos showing how the pocket bag lining is attached.

 |
| Align the top raw edge of the pocket lining to the raw edge of the welt . |
 |
| What it looks like after pocket bag lining is pressed down. The main pocket bag is then sewn over this assembly. The top raw edge of the main pocket bag will align with the raw edge of the front, not the welt. |
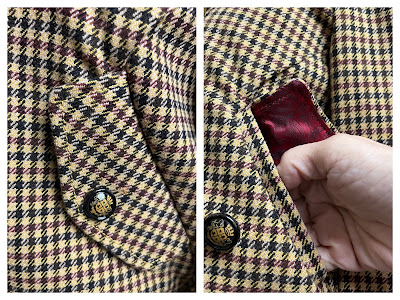
iii. Assemble the pocket flap and pin over the assembled pocket, covering the welt.
 |
| It is not so obvious from this photo but I trimmed a scant 1/8" from the side and bottom of the lining. This way when the pocket assembly is turned inside out, the lining favors the wrong side and will not show through at any time to the right side. |
iv. Sew side front to front: I don't have a photo to show but the side front is shaped like a triangle and is sewn to the front like a jigsaw puzzle. Worth noting that the side front is sewn over the attached pocket.
2. Sew the back. Sew the center back seam together. The center back seam is not a straight line. There is a bit of a curve.
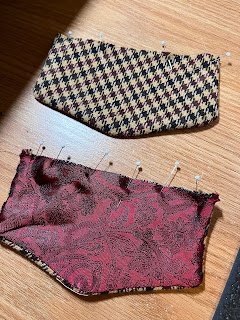
3. Assemble the yokes. There is a front and back yoke that will serve as the storm flaps. They are lined so this step involves sewing the yokes to their lining and sewing the buttonholes.
 |
| Top: front yoke showing the lining. Bottom: back yoke |
I used the same method of offsetting the lining to avoid peek through.
 |
| Buttonhole sewn on back yoke. |
 |
| Buttonhole on front yoke. |
4. Sew front to back. The front and back are connected through a yoke piece. After sewing the front to back along the yoke seams, sew the front to back along the sides.
 |
| As shown here, there is no visible shoulder seam. |
5. Stitch front facing to back facing along shoulder seams.
6. Collars. The collar is attached to a collar stand. Before they are sewn together, the back loop for holding the collar band is first basted into place.
 |
| This is the assembled collar/stand. Only one of them is interfaced and that will be the outer collar. The back loop piece is basted to the inner collar unit, the one that is not interfaced. |
7. Sew outer collar to assembled jacket shell. Sew inner collar to assembled facing.
8. Waistband. Make three belt carriers and baste to the corresponding waistband piece. There is one back waistband piece and two front pieces. Assemble the waistband pieces and sew to the lower edge of the jacket.
9. Zipper. Sew separating zipper in place. It helps to use a zipper foot. Depending on the size of your zipper tape, bear in mind that it will add width to the width of the front. (Just in case you are trying on the jacket without the zipper and think it feels too tight.)
10. Sleeves. Sew the under sleeve to the upper sleeve. Set in the sleeves to the jacket.
 |
| Burdastyle only has a single notch on the upper sleeve to denote the front area unlike other patterns which use double notches to also denote the back. |
11. Lining. Construct the lining.
i. Sew center back seams and ease pleat.
ii. Sew bust darts on front.
iii. Stitch front to back at shoulders and sides leaving an opening on one side for bagging out lining later on.
iv. Set in sleeves.
v. Sew assembled lining to assembled facing.
 |
| Ready for joining! |
12. Assemble jacket and lining. The assembled lining and jacket are sewn together and then bagged out.
13. Finishing. Topstitch along the edges. Make the belt, collar band and sleeve bands.


I hope this breakdown of steps proves helpful! I know I will be referring back to them if ever I decide to sew another one. And now here are some photos showing the details and some more action shots.


I love this look. All the puzzle piece came together so well! Lovely sewing.
ReplyDeleteThanks so much!
DeleteThat is one gorgeous jacket! You look fabulous!
ReplyDeleteThank you so much!
DeleteAs always, your sewing work is impeccable. This is such a beautiful jacket and you look great in it.
ReplyDeleteThank you so much for such kind words!!!
DeleteThank you for taking the time to fill in the blanks that Burda left out…so very helpful to those of us without your amassed skills. You do an excellent job at documentation! Love the jacket…your pattern matched so well I missed the front storm flap in the first picture
ReplyDeleteThank you! I'm glad this post is helpful!
DeleteWhat a triumph of sewing expertise! You added to the challenge by choosing checked/plaid fabric. You look sporty and cute in your new jacket.
ReplyDeleteThank you so much for the kind words! I got excited when I saw this pattern and thought what a great match for the fabric. But I always forget how time consuming and fiddly it is to do pattern matching! I had to slow down and be patient to be able to enjoy the process!
Delete