It's December, that time of year when I take break from "selfish sewing" to make handmade gifts for my loved ones. And this year, I made hubby a wool coat. I chose Vogue 1930 because of the slim silhouette which works well for his build. I posted a detailed review of the pattern at Pattern Review.
PatternReview.com. Below are just the construction highlights accompanied by pictures.
 |
| Posing like the pattern cover. |
 |
| Vogue 1930 is a relatively new pattern release. |
 |
| Main fabric is wool cashmere woven from Mood Fabrics. Lining is polyester viscose blend from Bias Bespoke. I used woven sew-in interfacing in the form of hair canvas from Emma One sock. All other notions like 1/2" shoulder pads, tailors head and buttons were from Bias Bespoke. |
Construction Highlights:
Interfacing:
 |
View of the hair canvas sewn to the wrong side of the corresponding piece.
|
 |
| The interfacing is sewn within the seam allowance of the main fabric. |
Outside Welt Pockets:

|
| Because the interfacing is sewn-in, I basted around the edges of the welt pocket to keep interfacing in place. |
 |
| The slashed center of the welt pocket intersects side and front. |
 |
| Finished pocket. The seamline running across the pocket is the side/front seamline. The one to the right is the front dart. |
 |
| Welt pocket in action! |
Inside Welt Pockets
 |
I did not follow the pattern instructions for this welt pocket. Instead of slashing
the center beforehand, I sewed the two welt pieces in place before slashing. I used
1/4" masking tape to mark my stitching lines. |
 |
View of the wrong side before slashing.
|
 |
Pocket bag in place, prior to folding.
|
 |
Finished inside welt pocket.
|
 |
| He's happy with the pocket! |
Collar
The collar is actually one piece but the look of a collar stand is achieved by topstitching across the lower third. This is done after the collar pieces (collar and interfaced facing) are assembled. My fabric was tricky to mark so to ensure accuracy, I made a template using the collar pattern piece as guideline.
 |
| It may be hard to see because of the fabric but there is a line of topstitching at the collar. |
Sleeves
The sleeve cap and side seam of the upper sleeve had some ease that needed to be pressed down. Luckily my wool coat pressed beautifully.
 |
| Before pressing, you can see the pucker on the wrong side of the upper sleeve. |
 |
| After pressing, it is all flat. |
 |
Tools for pressing wool.
|
 |
| Shoulder pads and tailor's head in place. |
 |
| Another view. |
Buttonholes/Buttons
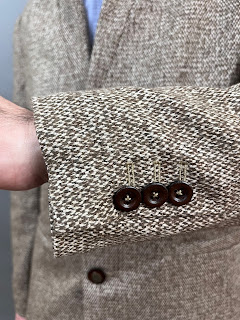
Although the sleeve cuffs have three "kissing buttons" that are nonfunctional, I still had to make those buttonholes.
 |
| These three buttonholes were machine stitched and left as is, no slashing. |
 |
| Three "kissing buttons" |
 |
| View of the lining along the cuff. It has no vent and the buttons anchor the lining to the main fabric. |
 |
| It's not perfect but I'm quite happy with how my hand sewn buttonholes turned out considering it's my first time trying the method. I didn't have gimp cord so improvised by twisting four strands of my polyester all-purpose thread. I used buttonhole thread for the buttonhole stitches. |
 |
| DIY gimp. |
 |
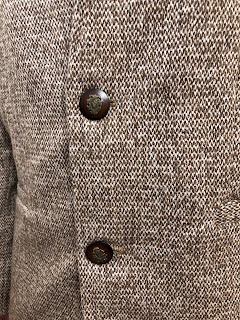
| Large buttons for front closure. |
Other Features
Finished Coat
And here are some modeling photos and close-up views of the finished garment.


That is a great coat. I love that collar. You've done a great job as usual.
ReplyDeleteThanks so much! It was a lot of work but worth it!
DeleteBeautiful work, dear Maria! Thank you for sharing in such detail.
ReplyDeleteThanks so much for reading and for the kind words!
DeleteBeautiful handiwork for a proud hubby.
ReplyDeleteThank you so much! He is so excited to wear this!
DeleteWhat a great jacket - you are my sewing hero. I want to copy every make you do, you do them so well.
ReplyDeleteAww thank you so much for such kind words!!!
DeleteBrava!
ReplyDeleteThanks so much!
Delete