Long before my daughter announced her engagement last year, she already hinted to me that when she got married, she wanted me to sew her wedding gown. So when the date was set, I started reading everything I could about bridal wear sewing. The most useful source of information was Pattern Review. There I found a pinned topic on Couture Quality Bustier which contained a comprehensive tutorial on how to sew a strapless bodice with boning, padding and inner closure. The Bridal and Formalwear Sewing Forum was also filled with information shared by fellow sewists. That was how I found out about the book Bridal Couture by Susan Khalje which became my sewing bible during the wedding gown construction.
About
the pattern
The wedding gown silhouette my
daughter wanted was an off-shoulder with almost sweetheart neckline,
close-fitting all throughout then flaring out into a mermaid style at the
bottom. She wanted it fully covered in lace. She did not care for a train. With
that said, here are the two patterns I used as baseline for the wedding
gown.

Vogue 2515
The bodice style of this pattern was
perfect for what my daughter had in mind. How ironic that the pattern was
designed by Bellville Sassoon, the same designer who created Vogue 2929 which I
used for my daughter's prom gown, the same gown that gave me so much grief that
I ended up searching for online help and discovering Pattern Review. The
experience also led me to create this blog and write my first post in
2011 which you can read here.

Simplicity 8329
The skirt
part of this pattern fit the bill as far as silhouette was concerned.
Long
Distance Fitting
Did I mention my daughter lives in
the East Coast and I'm in the Midwest? Well, that made me a little nervous. But
my daughter never expressed any doubt so that kept me going.
When she visited in the summer, I
took her measurements and made her dress form body double using the Bootstrap
sewing pattern which I blogged about here. The dress form provided a baseline for the
initial muslin fitting. Subsequent fittings were done via Skype. I would mail
her the muslin and she would try it on and then I would instruct her where to
pin. We went through this process several times throughout the year. There was
one time when the USPS lost my package containing the muslin which has already
undergone several modifications! Thank goodness it was recovered.
It was almost three months before
the wedding date when we finalized fitting and I was ready to cut into the real
fabrics. The reason it took so long was I had to finish her engagement dress
first which you read about here.
Fabrics
The Vogue pattern called for three
layers for the bodice: a main outer fabric that was interfaced, a middle layer
made of woven interfacing to support the boning and an inner lining layer. I added one more lightweight middle
layer that had additional boning and bra cup. And I also used a lace overlay.
So to summarize:
From innermost to outermost:
1) Lining--charmeuse in classic
white purchased from Emma One Sock
2) Layer with bra cup and princess
seam boning--China silk (I added this layer. It was not included in the
pattern).
3) Layer with boning as drafted in
the pattern--Pro Woven Superior Sew In Lightly Soft, a woven interfacing that
had the drape and weight similar to broadcloth, purchased from Fashion Sewing
Supply.
4) Main Fabric--Noble Duchess
Satin in white purchased from a local fabric store (Anatol's) and fused with
Pro Sheer Elegance Light fusible interfacing, also from Fashion Sewing
Supply.
5) Alencon lace--reembroidered lace
in white, purchased also from Anatol's.
For the skirt, I skipped layer 2 and
3. For the lower part of the skirt, I added tulle netting for a little more volume.
Notions
*1/4"Rigilene polyester
boning and casing--from BiasBespoke.com
* 3/8" cotton twill tape for
easing in neckline--from BiasBespoke.com
* foam bra cups
*18" long YKK #5 concealed
heavy duty zipper from Zipperstop
*Silk thread for basting
* Japanese steel size 9 sewing
needles for hand sewing--from Etsy
* Japanese glass head silk pins
*Petersham grosgain ribbon for
waist stay
*Narrow ribbon for hanging loops
*Embroidery thread for the special label
Construction
Photos
I
don’t intend to post a step by step photo tutorial of the wedding gown
construction. I just want to highlight some details that could also prove
helpful to anyone sewing something similar, not necessarily the same pattern. With that said, be ready for lots of photos!
Bodice
|
||
|
||
|


 |
| View of the bodice from the outside after being machine stitched. |
 |
| The middle layer which I added (not part of the pattern) had a pair of boning and foam bra cups sewn to the front princess seams. |
Front Neckline
~The wedding gown had a wide V-neckline
that extended to become the off shoulder sleeves.~
 |
| To stabilize the V point before clipping, I sewed a square piece of silk organza on the wrong side and used small stitches to staystitch one inch from the center point. |
The succeeding photos show the process of “easing in” the front neckline to a strip of twill
tape to address the problem of front neckline gaping.
 |
The twill tape was cut shorter (by around 5/8") than the neckline. |
 |
| Lots of pins were used to secure the tape to the neckline. |
 |
| It was then hand basted in place. |
 |
| A view of the neckline from the right side. |
A view of
the neckline after the seam was turned in.
Lace Overlay
~
~When I cut
the lace pieces, I left a very wide seam allowance. My plan was to use
invisible seams by overlapping the lace seam allowances, handstitching the top
layer in place and trimming any bulk underneath.~

 |
| Here is a nice view of the Alencon lace. The corded edges made it easy to trim without causing them to unravel. |
 |
| Here is a view of the overlapping lace edges before sewing. |
 |
| A view after sewing. Can you see any seams? If not, then my invisible seams worked! |
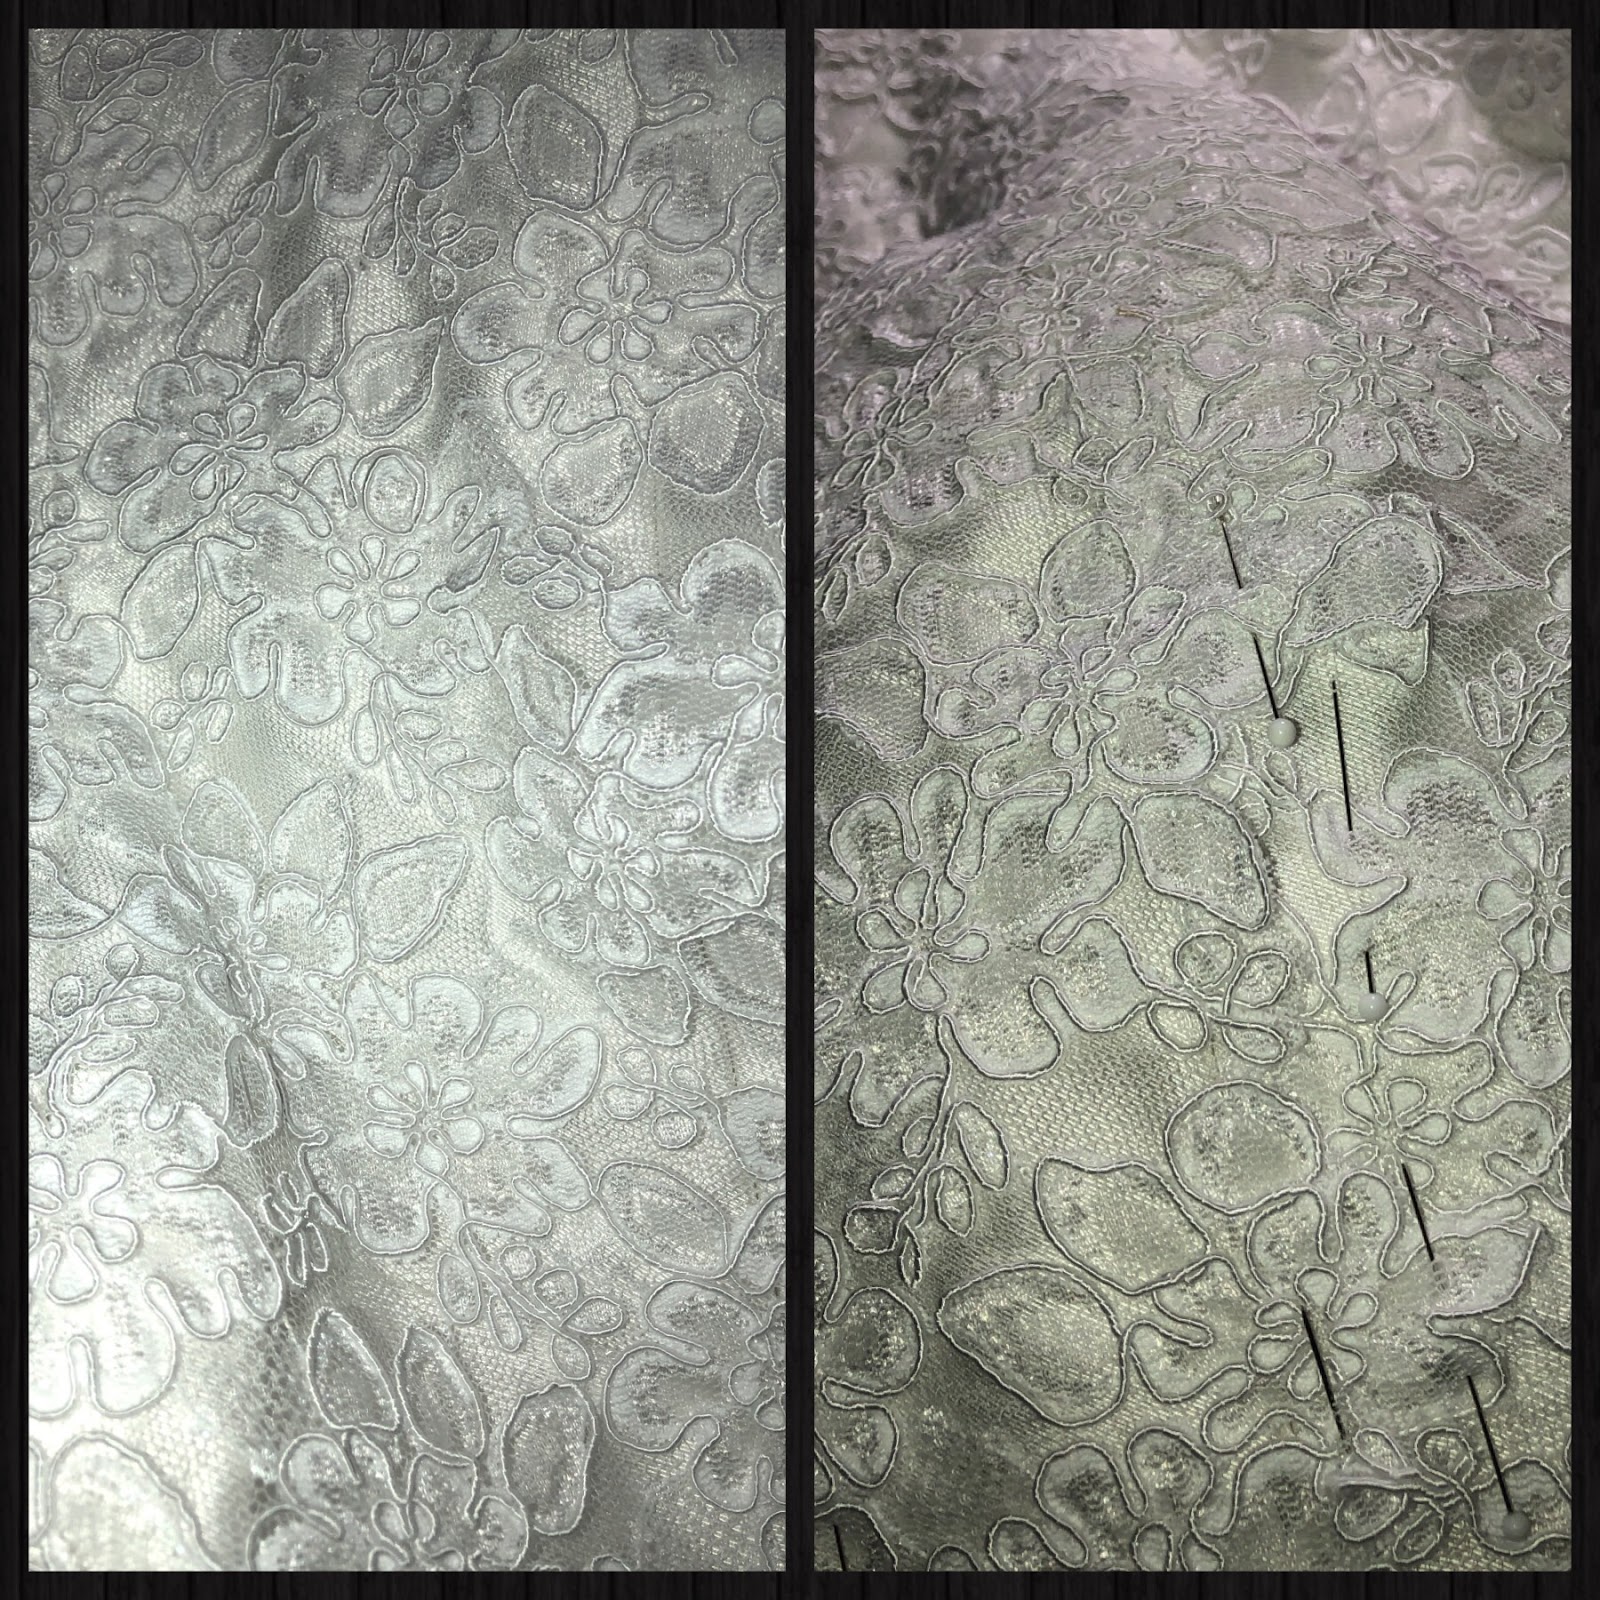 |
| Here is another example. The one on the left had invisible seams already sewn. The one on the right shows the layers pinned. |
 |
| This a view of the lower skirt. |


 |
| I used the border of the lace fabric and appliqued it to the skirt bottom. |
The Innards
 |
| When it came to the neckline and armholes, I just turned in the lace edges and sewed in place. These were later covered by the innermost layer, the lining. |
 |
| In addition to the lace edges, this photo also shows the inside of the partially assembled gown. The seam allowances were all sewn open using catchstitches. |
 |
| The sleeve allowances were clipped close to the seamline, turned in and sewn in place. |

 |
| A view of the hemline. |
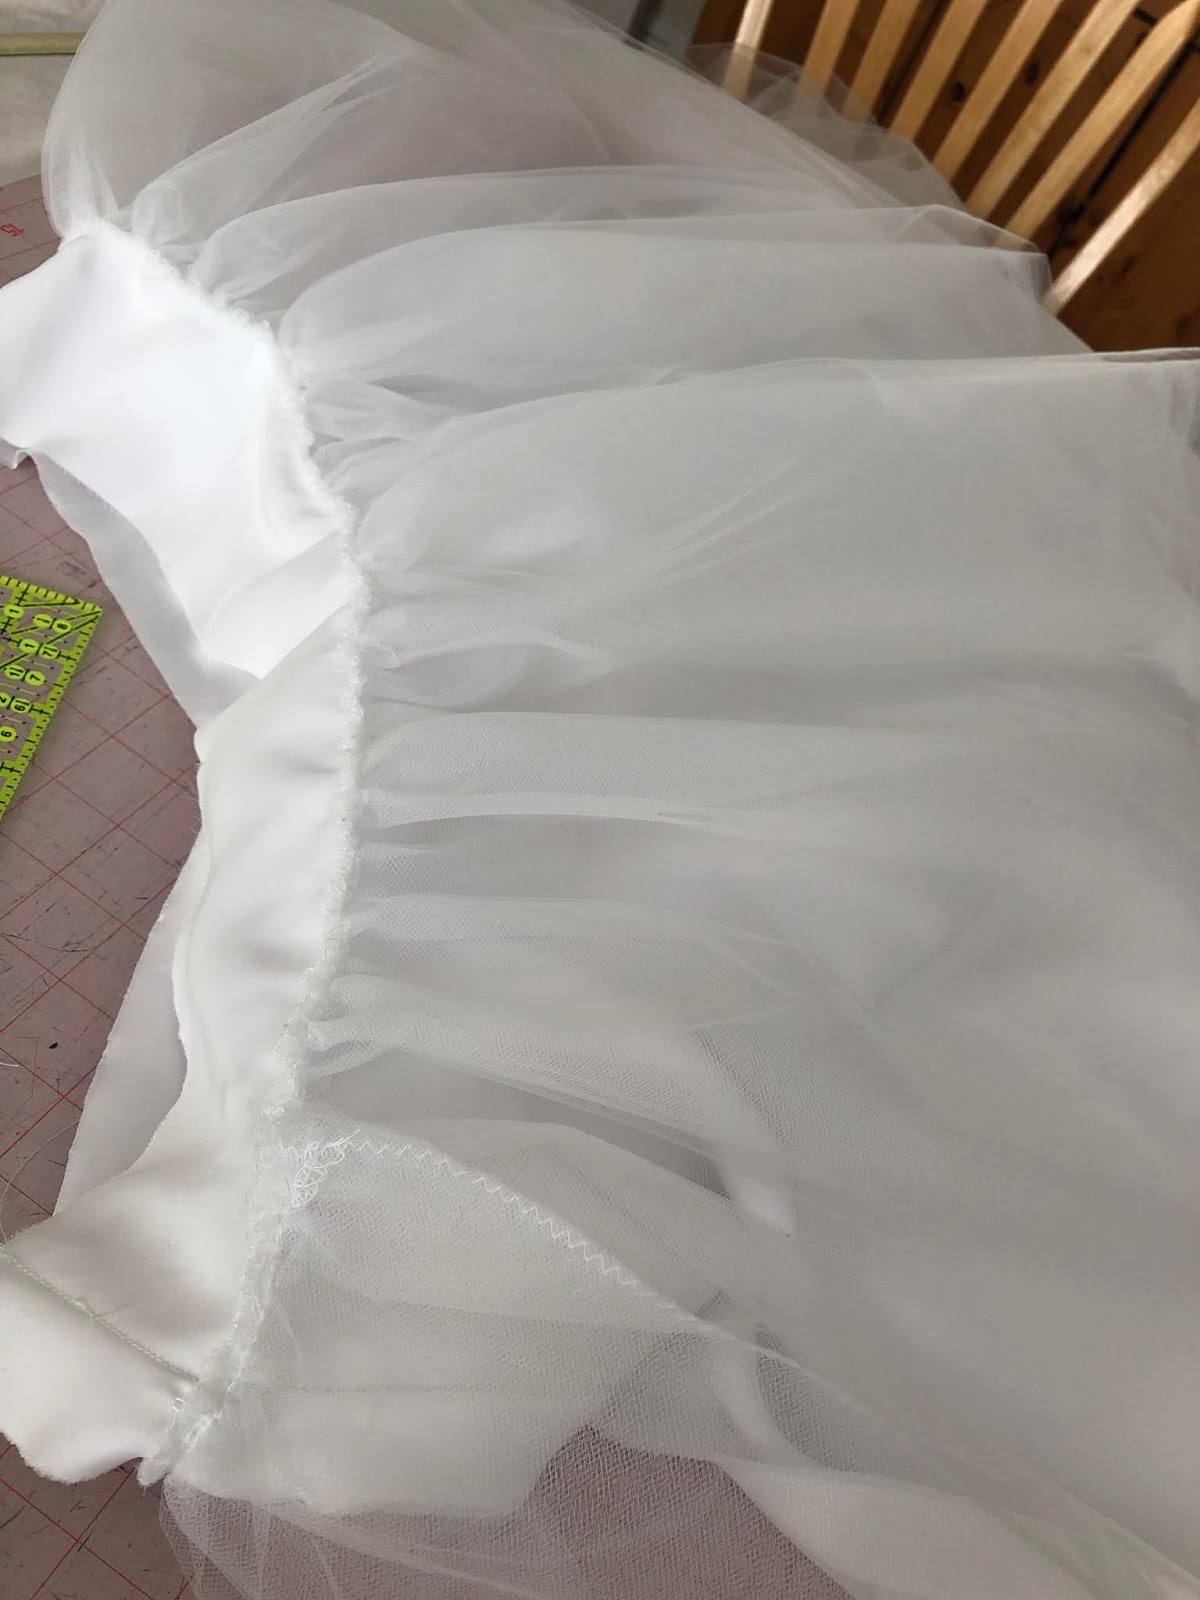 |
| I added tulle netting to the bottom part of the skirt for a little more volume. |
Additional Details
~Lace trim~

 |
| A beaded embroidered lace trim that matched the Alencon lace was sewn to the perimeter of the neckline. |
 |
| Pickstitched lace trim (viewed on the wrong side). |
~Waist stay~
For added
insurance, I added a waist stay. It was tacked to the middle layer seams underneath
the lining. A small gap was left in the lining seam at the back to allow the
ends of the waist stay to come through.


 |
| I used a Petersham grosgain ribbon and added hook and eye for closure. |
~Hanging loops~

 |
| I also added a pair of ribbon loops for hanging. |
~Something Blue~
 |
| As a special touch of something blue, I embroidered the couple's initials and their wedding date on a piece of satin and sewed it to the lining of the back bodice. |
Zipper
~The pattern called for button
closure on the outside and zipper on the middle layer. My daughter did not want
buttons so I just used a heavy duty invisible zipper.~
 |
| I hand basted the zipper to the center back layer leaving the lining free. |
 |
| View of the zipper after it was machine sewn. The lining was then hand sewn. To prevent the embroidery from getting caught I pickstitched it along the edges. |

 |
| Additional views of the zipper closure. |
~And here are sneak peeks of the finished gown.~


 |
| Daughter trying out the finished gown for the first time, a few days before the wedding. I was really amazed at how perfectly it fitted her. No last minute alterations were needed. |
In her introduction to her book "Bridal Couture," Susan Khalje said,
"...couture translates into careful, logical, well-thought-out applications of solid technique. Whether in the House of Chanel or in one's own workroom, the components are the same: Fabrication, Design, Fit & Proportion, Engineering & Inner Structure and Workmanship."
She said it is the dressmaker's challenge to weave the elements together to create an other-worldly garment. I never dreamt I would one day be weaving these elements together to create something special for my daughter!
What a treat to see this beautiful workmanship Maria! Thank you for sharing!
ReplyDeleteThanks for reading Diane! I always appreciate your kind words!
DeleteAbsolutely stunning!! It is all impressive but I especially am taken with how well you have pieced all the lace together. Definitely invisible seams.
ReplyDeleteThanks so much Katherine! It was scary at first but spending hours on it helped me get the hang of it!
DeleteImpressive work and gown! Congratulation on it all! So happy for you to be able to do this for your daughter!
ReplyDeleteThanks so much Georgia! I used to sew my daughter's dresses when she was still a toddler and I thought she would prefer to buy RTW when she grew up but she was always happy to have me sew for her so this is truly special!
DeleteWell of course it fit her perfectly--what a testament to your skill, and all of those Skype fittings! WOW! It is absolutely beautiful, and your skill level is impeccable. I hope this is a dress that gets passed down in the family...
ReplyDeleteThanks so much for your wonderful compliment Vanessa! I learned a lot from this experience and all the hard work was truly worth it!
DeleteAs I said before, all of this was done with your usual impeccable work! I would love to know the approach you used in handling/cutting the silk charmeuse, as it is so slippery! Perhaps you would be kind enough to post a small tutorial! Thank you!
ReplyDeleteThank you for your kind words! I'll put that on my to do list (a tutorial on handling slippery fabrics). Meanwhile, just to let you know, when I cut slippery fabrics like silk charmeuse I put paper underneath the silk charmeuse (anything from gift wrapper to tracing paper), pin them (outside the seamlines to avoid leaving permanent holes on silk) then cut. For cutting, sometimes I use rotary cutter,sometimes scissors. For the latter I use microserrated scissors. Hope that helps!
DeleteWhat a masterpiece! Your careful, artistic attention to making your daughter's dress was an incomparable gift to her and to their marriage.
ReplyDeleteThanks so much for your kind words Carol! I'm glad I could do this for her!
DeleteI have a question, on the twill tape around the bust seams - I see what the twill tape is doing, but I am confused about exactly where it is. I think that it is attached to the underlining of the main garment, and that it is lined up so that it is on the seam allowance. If you could explain a little more I would be grateful. I put together a sweetheart strapless bodice muslin, and I see I definitely need it. I have Susan Khalje’s Bridal Couture book but your blog post is much clearer. Sorry this is an anonymous post but I couldn’t figure out how to use my google I’d - Lauren.lesperance@gmail.com
ReplyDeleteHi Lauren, I wrote my reply under your second comment.
DeleteQuestion about twill tape: I read Bridal Couture on how to used twill tape around the princess neck area to bring in gaping. Your pictures in the blog made it much easier to understand, but I'm not there yet - It seems that you put the tape in the seam allowance, right up to the stitch line of the underlining, pining a gazillion times. But what next? Are you sewing tape down right at seam allowance, or are you then pinning lining on and capturing twill tape in seam? I think I might be making this more confusing than it is. I am in process of making a strapless gown for my daughter and noticed the gaping around the top bust. I am going to tighten the princess seams up a bit, but feel I need to do this as well.
ReplyDeleteYour work is beautiful!
Hi, sorry about the late response, I haven't been receiving notification about comments. Anyway, I hope I'm not too late. The best way to understand this is to compare it to stay tape that we use to stabilize shoulder seamlines. You'll want the twill tape to be caught in the seamline when you sew everything in place so it stabilizes the neckline. Just center it along the seamline and the most accurate way to do this is mark your seamline (by basting, as you wouldn't want to use markers) first. Best of luck!
DeleteLauren, this is an addendum as I can't edit my reply above. If your garment is underlined, you put the twill tape over the underlining/main fabric before attaching the lining. If it is not underlined, you just put the twill tape over the main fabric, before the lining is sewn.
Delete